
Field Notes from N1JUR
Real-world ham radio tips, portable operating lessons, gear thoughts, and activation stories from the field to the shack.
What You’ll Find Here
This blog is where I go deeper than a YouTube description. You’ll find practical ham radio guides, activation lessons, gear breakdowns, and field notes from real operating experiences.
Some posts are beginner-friendly. Some get a little more technical. And some are just honest lessons from the field — because not every activation goes perfectly, and that’s usually where the good stuff happens.
Portable operating tips
POTA, SOTA, and location-based activation ideas
Gear and antenna experiments
Beginner-friendly ham radio guides
Field stories and lessons learned

Get Connected: Setting Up Your Ham Shack Hotline
Ham Shack hotline primer. Learn more about the non-traditional Communications mode that can open up your world to Ham Radio Communications.
Hey there, fellow radio enthusiasts! Are you ready to take your ham radio game to the next level? It's time to set up your very own ham shack hotline and open the door to a world of communication wonders. Let's dive in and discover the benefits and steps to get you up and running in no time!
For those who would like to jump in and get set up, I have a video posted on getting set up with HamShack Hotline.
Benefits of a Ham Shack Hotline
1. Stay Connected: With your own ham shack hotline, you can easily connect with other amateur radio operators near and far. It's like having a secret line to the coolest club in town, but for radio lovers!
2. Emergency Ready: When the going gets tough, a ham shack hotline can be a lifesaver. During emergencies or natural disasters, traditional communication may go haywire, but your hotline will keep you in touch with the outside world. Understanding that if you have backup and strong internet it can serve to be another mode of communication
3. Tech Support on Speed Dial: Got a tricky technical question or need help troubleshooting? Your hotline is the direct line to experienced operators who can lend a hand when you're in a radio bind.
Steps to Setting Up Your Hotline
Step 1: Get Your Line
First, you'll need a dedicated phone line for your ham shack. There are several older VOIP Phones you can pick up on the cheap to get set up. You may need to do some digging into how to properly configure it for the service. Y
Step 2: Ring Ring! Choose Your Number
You’ll need to use the HH Setup service which is outlined on their site to acquiring a extension and if you so choose an external number as well.
Step 3: Plug and Play
Install the phone and you’ll need to wait for the implementation team to send you the instructions to provisioning your phone for their network. Once that’s done and a few reboots later you’ll have access to the Ham Radio Hotline Network.
Step 4: Spread the Word
Shout it from the radio waves! Let your local clubs, online forums, and radio nets know about your new hotline. The more, the merrier, right? Get folks in your local club interested as it can help to have a quick way to connect to each other.
Step 5: Let the Connections Begin
With your ham shack hotline good to go, get ready to dial in and make some awesome new connections. Whether it's swapping stories, seeking advice, or just sharing some good old radio banter, your hotline is the place to be.
So there you have it, folks! Setting up your ham shack hotline is a fantastic way to supercharge your radio experience. It's all about staying connected, being prepared, and having a blast while you're at it. Now go on and get that hotline humming with the sound of friendly chatter and radio fun!
My POTA Kit
I am creating a blog series on My POTA Kit. This is my main activation setup and all the ins and outs of my setup.
So I’ve been doing POTA for over two years now with over 5000 contacts and over 156 parks activated under my belt. I have been able to work out my “go bag,” so I can easily setup in under 5 minutes - including the antenna.
So now that I have this blog to chronicle my radio adventures, I decided I might be able to share some of my experience and get you out and activate a park.
Now let me frame this topic a bit…
The goal of my setup is to get an activation setup within 5 minutes or less. I drive a lot for work, so the opportunity to activate a park between client visits sometimes is live a RADAR for me.
A setup that quickly maintains the line of efficiency makes things very easy to get up and running.
This is the difference between a successful activation and a failed attempt, as the airwaves can be challenging no matter how good your setup is.
I am fortunate to get the opportunity to activate new parks. This, for me, requires some quick scoping out and locating a spot.
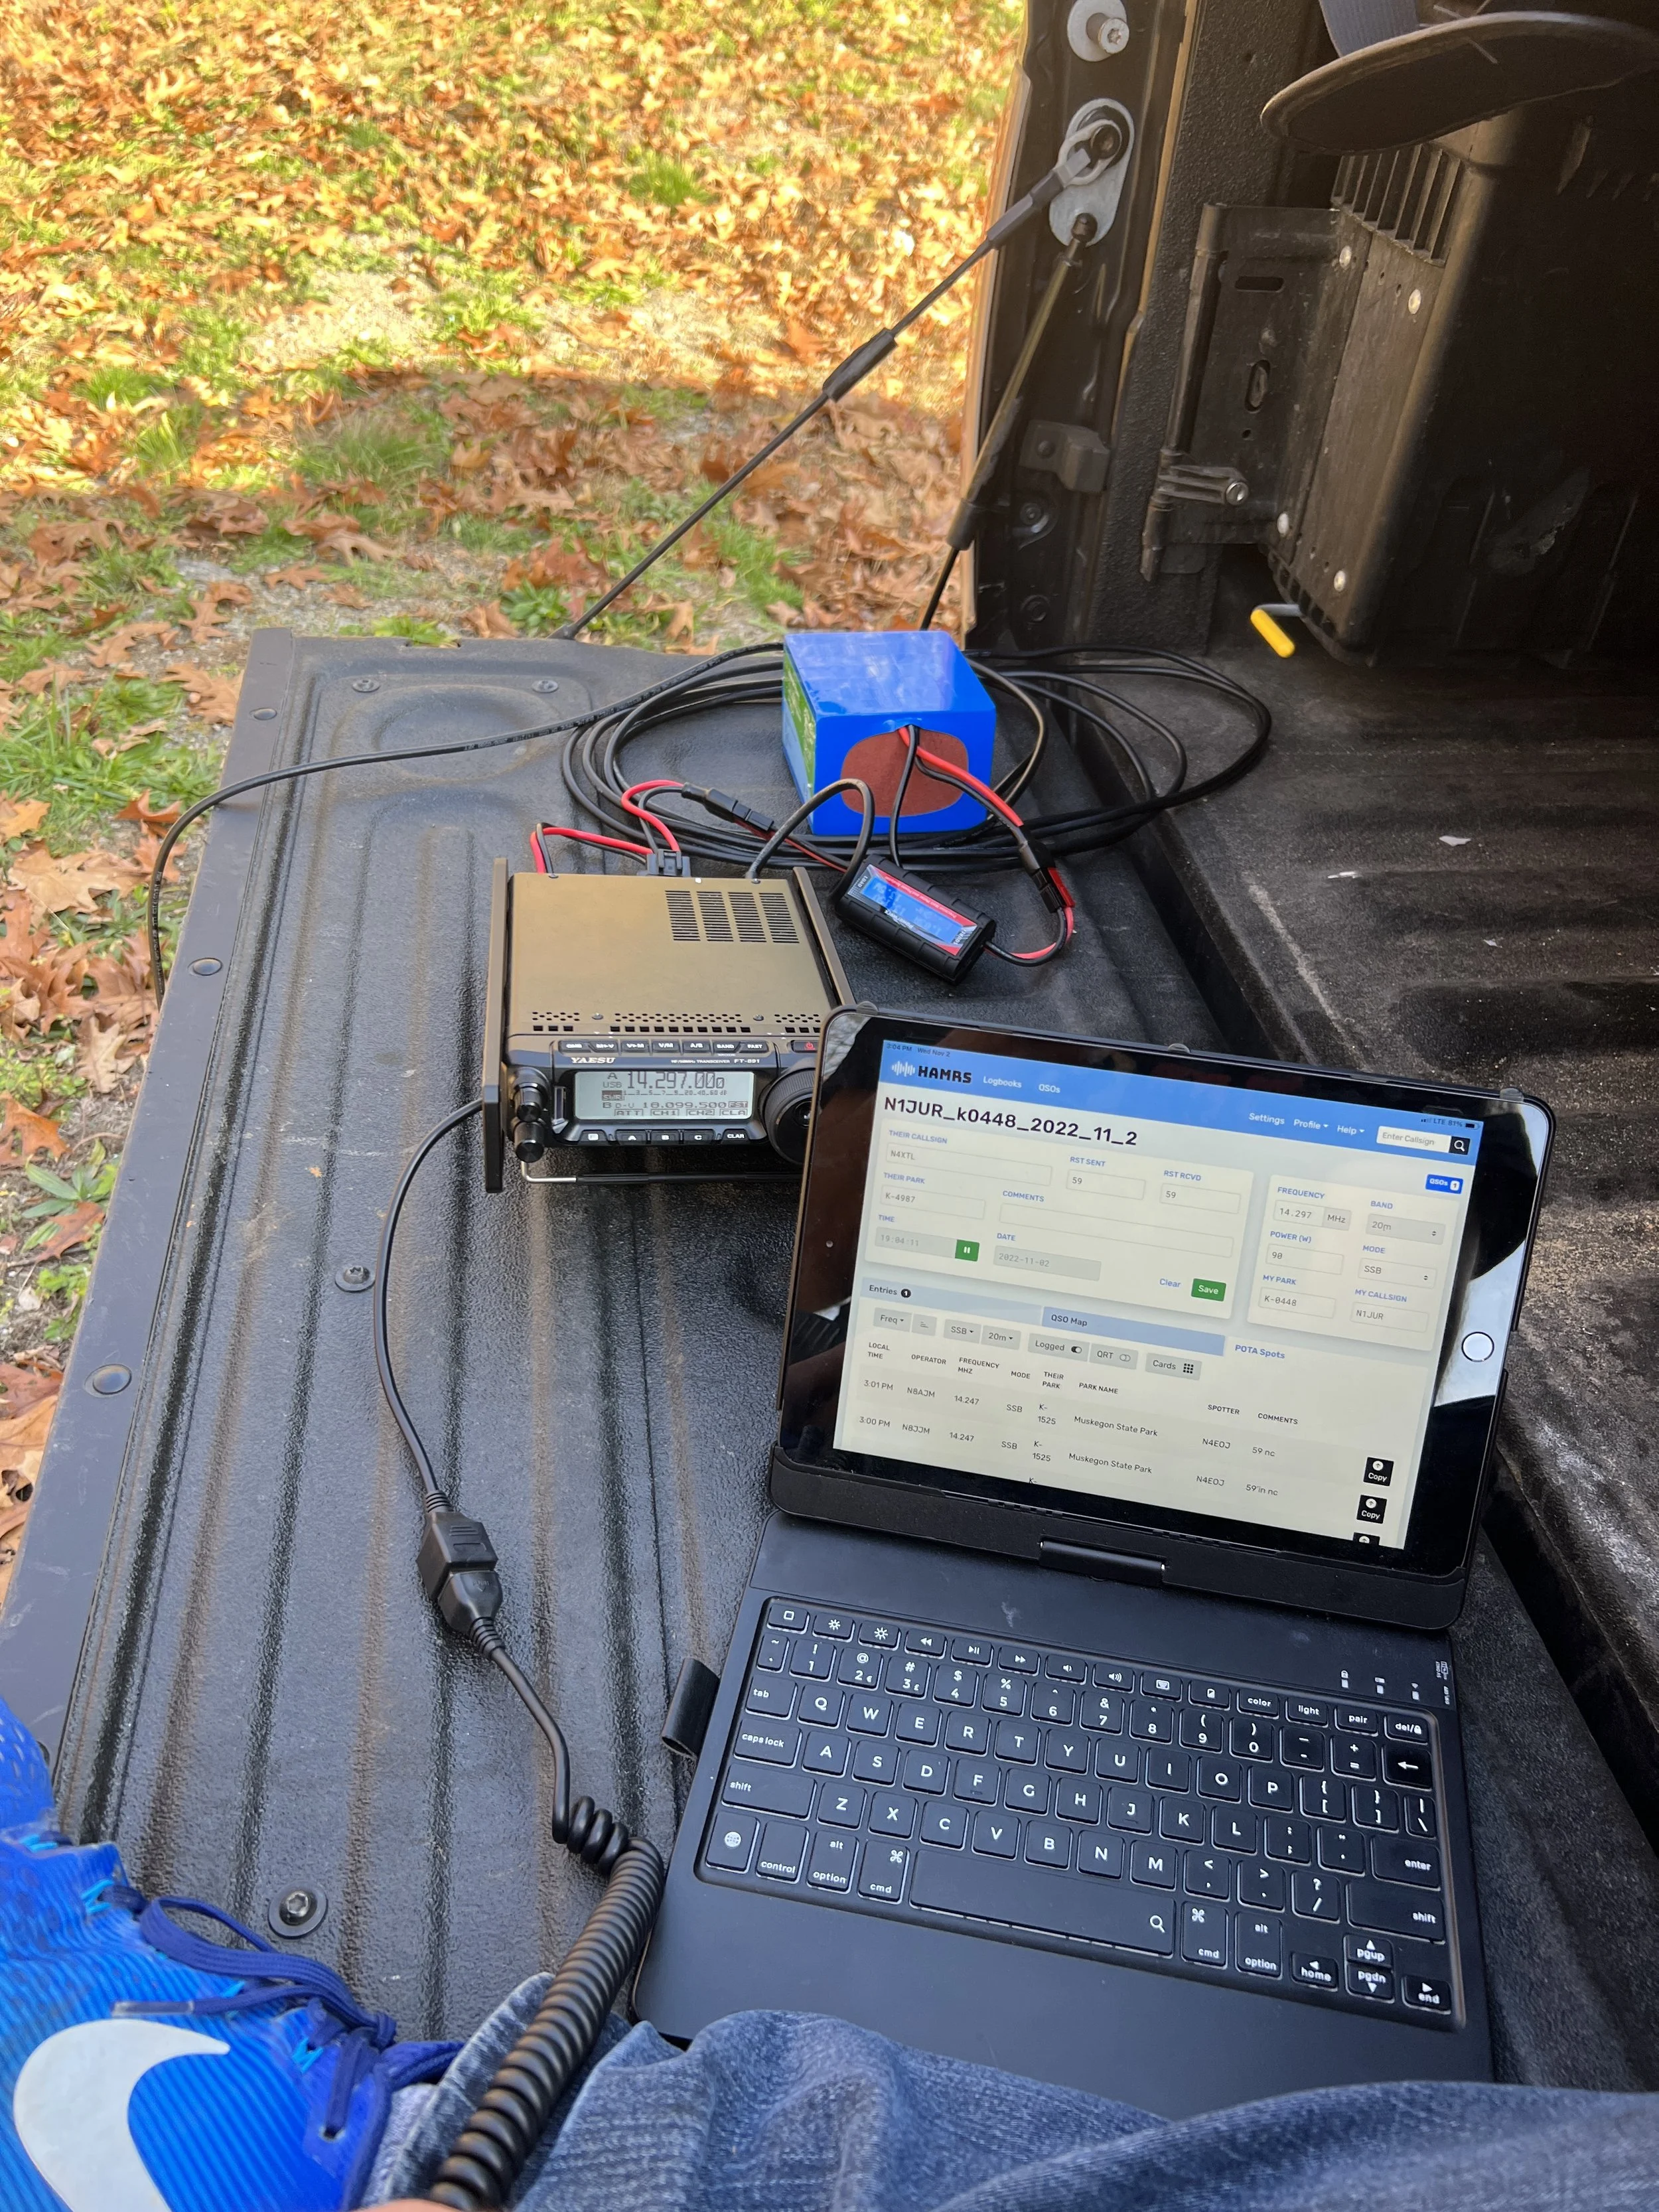
My Setup
So with my setup, I have the non-negotiables.
Black mesh zipper bags - This stores all cables, flexible ties, connectors, antennas, interfacing coax, and radios. These are the ones ladies use for makeup items. You can find them on Amazon.
Radio Bag- I have an Oakley Mail Currier bag - which is no longer made) that houses my radio, logging tablet, battery, power cords, and watt meter. The fold-over zipper case has additional zippered storage where my zipper pouches are all organized. I also have a Rig Expert Stick 230 and Powerwerks in-line watt meter to round out the bag.
I carry a pen and yellow stick-its, a 2-way mike splitter - for dual activations, a Digi Rig, and charging cables for the smartphone.
Everything in the bag is power poles and provides easy use when I need to cable power together.
The Logging Computer - I have two devices. I use an iPad with a Bluetooth keyboard for regular logging - an on/off switch is a must! If you can afford it, I would get the iPad with cell, as it makes it easy to do callsign lookups and synch the log.
I am in the process of building a computer for digital modes. But for this post, I saved that for another post as a video would help explain the process.
I use HAMRS for logging and Dropbox to sync my logs. My process is simple: setting up the log file in HAMRs and exporting the ADI file to Dropbox. When I get home, I open up the log file with ADIF Master, confirm all fields, park, and other items are in check, and then upload the file to the POTA.APP website for processing. Then, to give proper credit to the hunters, I created a profile on Ham Radio Deluxe for the park, ensuring the Grid Square is correct for the location profile of the park and imported the log file. HRD then does the heavy lifting for QRZ and LOTW.
Antennas
I can go into greater detail on these antennas - and will at a later date, but I’ll list them here to explain my kit. I do have many so let me explain
Spring/Summer/Fall Activations -
I use a combination of two antennas. My first go-to antenna is the Wolf River Coil TIA 1000, with the center-loaded section. I use the 24” base and have the dual collar option.

I use a combination of two antennas. My first go-to antenna is the Wolf River Coil TIA 1000, with the center-loaded section. I use the 24” base and have the dual collar option.
I also have a Buddiepole Pro, and this antenna doesn’t get a lot of use as sometimes the counterpoise can be finicky and need more attention to get set up. I do have to give this antenna more field time in the spring.
Winter/Cold Activations -
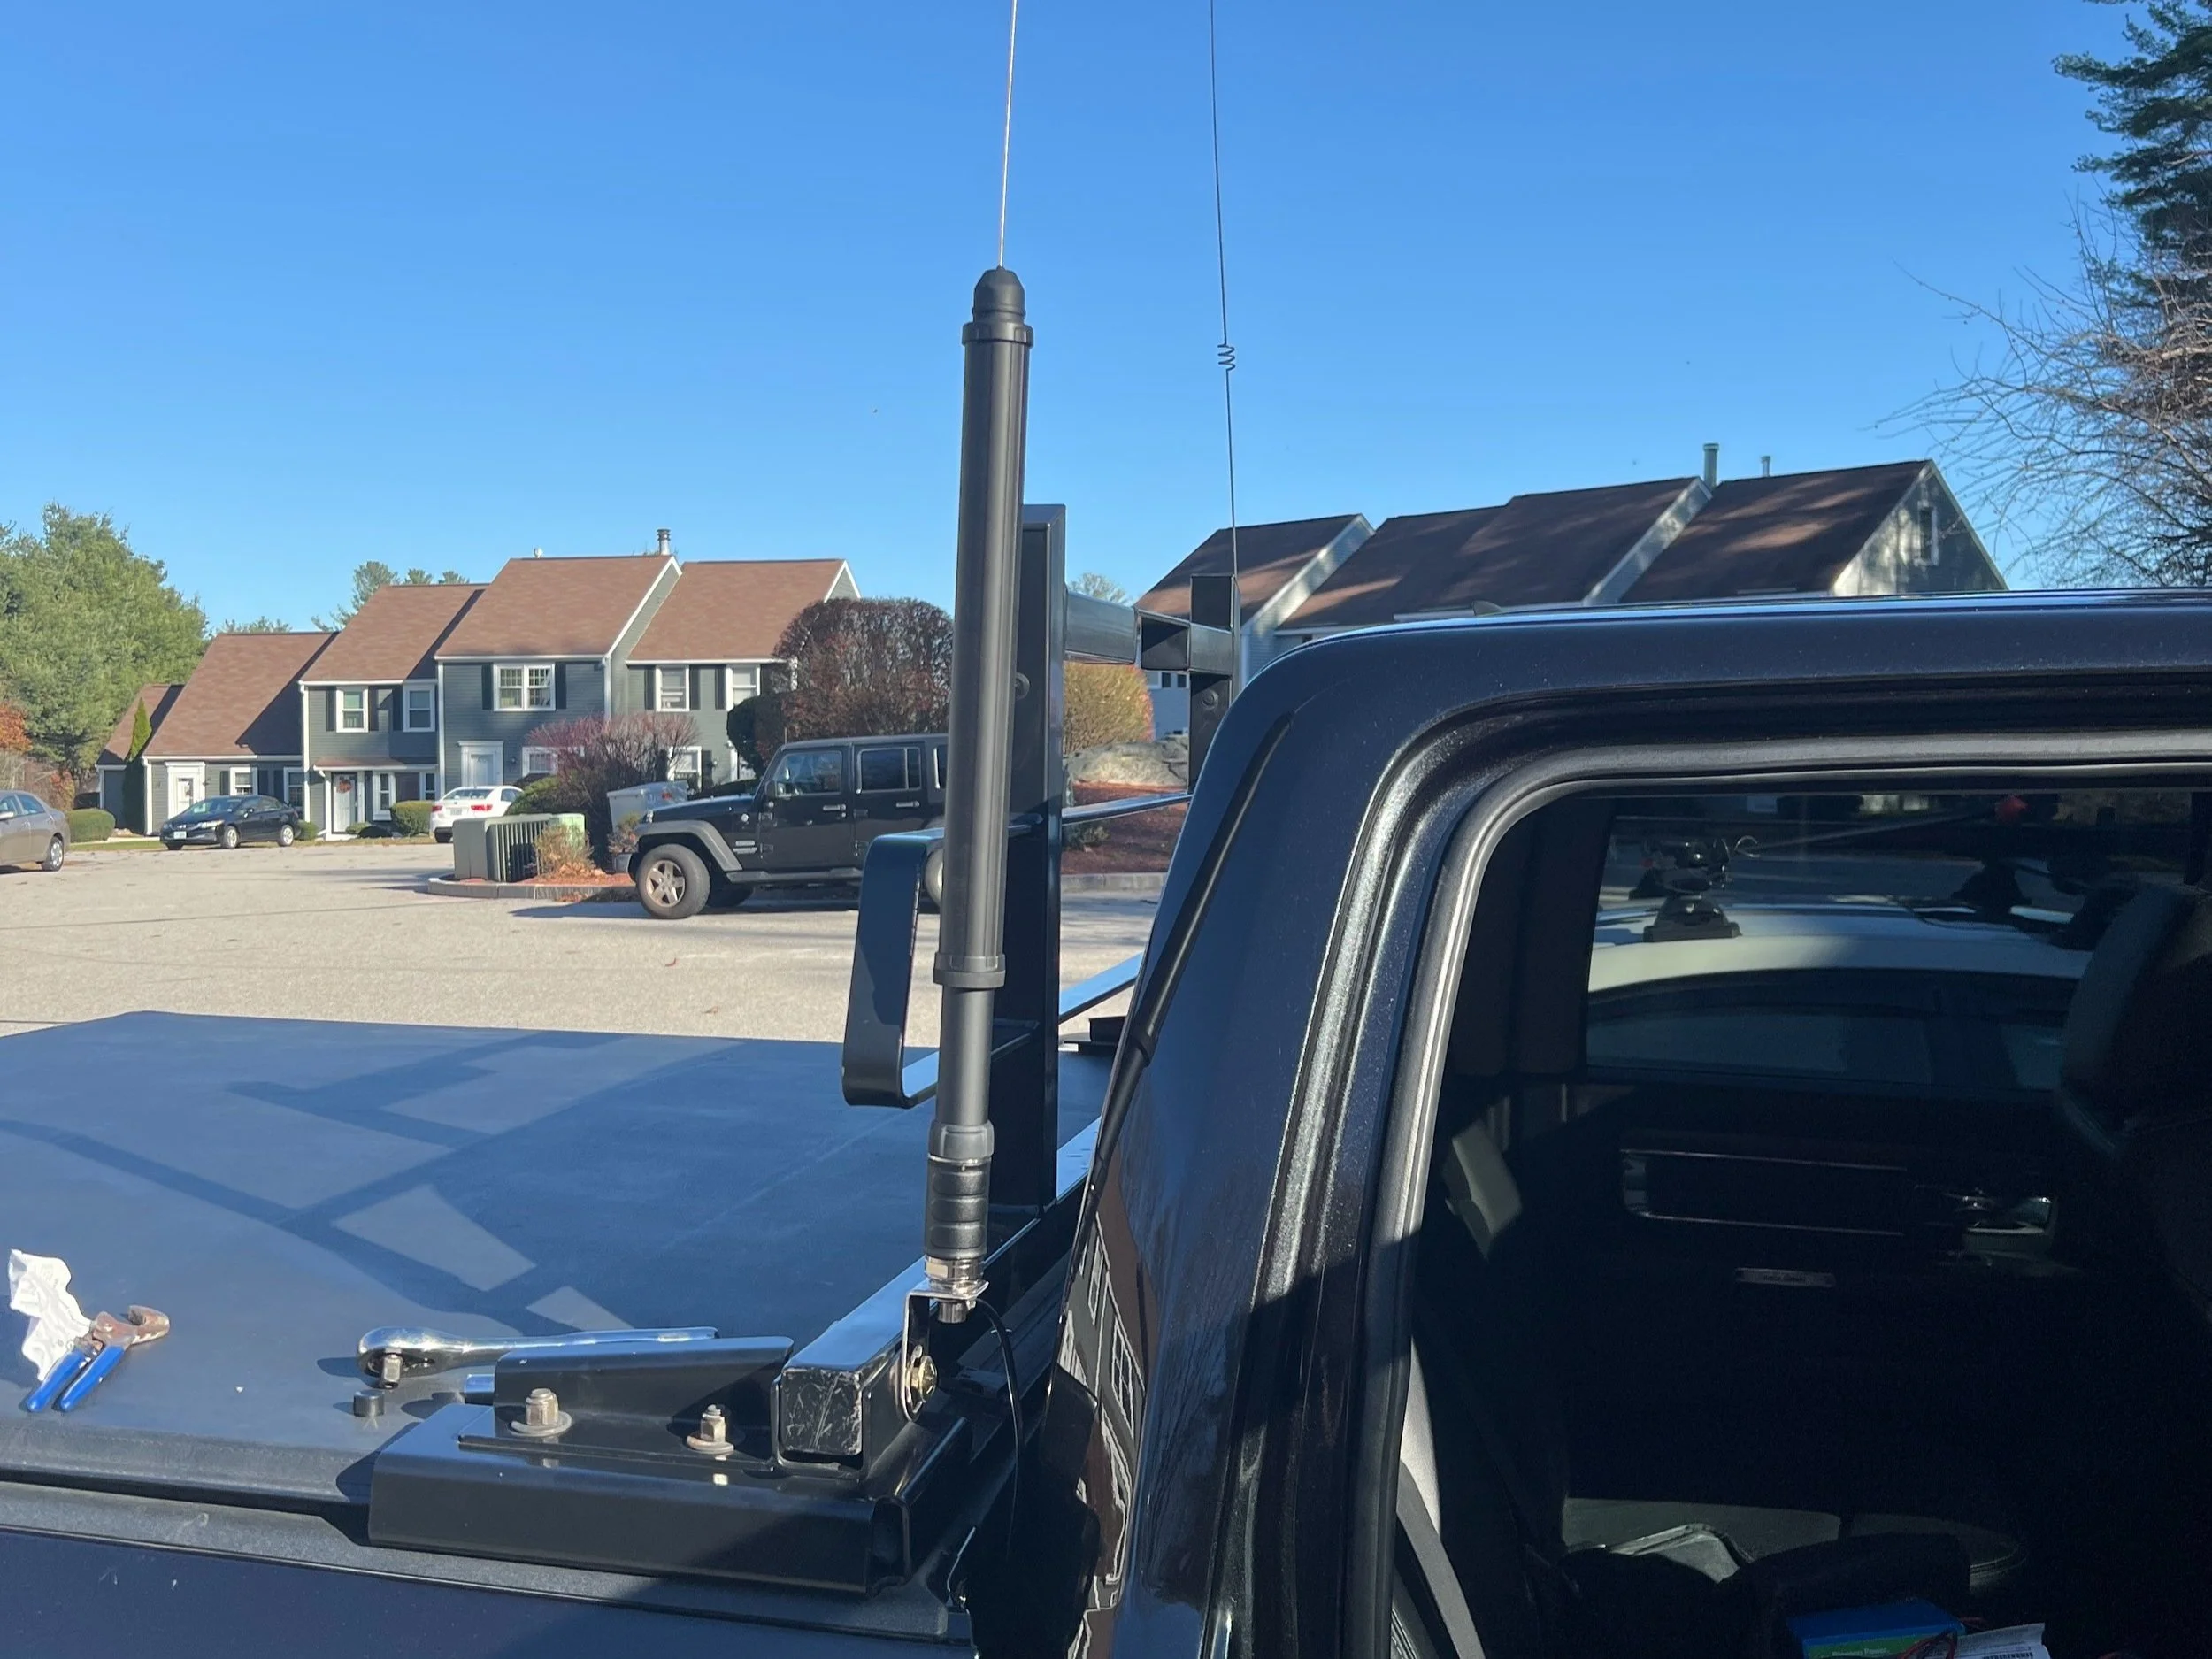
I do most, if not 90%, of my activations in the winter from my truck. I purchased in the spring of 2022 a Yaesu ATAS 120a and mounted this to my back rack.
I run a few wire antennas, with the Chameleon EFLFS 80-10 Lightweight Sloper being the one I use mostly. I plan to do some additional reviews on these at a later date. But I have used this once at a POTA Meetup with success and on several Field Day events.
Batteries
I haven’t tried the gamut of batteries out on the market, but my stable includes a 15-ah and 20-ah Bioenno battery. Both of these are charged using the Bioenno charging plugs, and I have never run out of power. I have a solar charge controller from Buddipole (Powermini 2) and a 60-watt panel. Still, I haven’t taken the time to assemble this kit with a 60-watt solar panel, but it will be forthcoming.
I know I can go further into the rabbit hole, but this is an excellent place to ask… What do you want to know about my setup?
I plan on posting more videos on YouTube and social media, and you can always come back to my site for the latest updates.
My question to my visitors is, what you’d like to know more about? My antennas? Setup? The tech? Let me know in the comments.

Show off your POTA Muscle on QRZ
Ever wanted to show off your POTA stats on QRZ? Well, now you can!

Make it stand out
If you want to integrate this into your QRZ page, head to Dan’s Website to grab the code and put it on your QRZ page.
Also, I created a quick video tutorial for those who might need some extra help.
Also, be sure to give him some love and click he buy me a coffee link