
Field Notes from N1JUR
Real-world ham radio tips, portable operating lessons, gear thoughts, and activation stories from the field to the shack.
What You’ll Find Here
This blog is where I go deeper than a YouTube description. You’ll find practical ham radio guides, activation lessons, gear breakdowns, and field notes from real operating experiences.
Some posts are beginner-friendly. Some get a little more technical. And some are just honest lessons from the field — because not every activation goes perfectly, and that’s usually where the good stuff happens.
Portable operating tips
POTA, SOTA, and location-based activation ideas
Gear and antenna experiments
Beginner-friendly ham radio guides
Field stories and lessons learned

Comparing the Wolf River SB1000, MadDog 80 Coil, and Rez 80 Antennas: Which One is Right for You?
When it comes to enhancing your radio communication experience, choosing the right antenna can make all the difference. Among the popular options available, the Wolf River SB1000, MadDog 80 Coil, and Rez 80 antennas stand out for their unique features and performance. Here, we’ll explore the differences between these three antennas to help you make an informed decision.
When it comes to enhancing your radio communication experience, choosing the right antenna can make all the difference. Among the popular options available, the Wolf River SB1000, MadDog 80 Coil, and Rez 80 antennas stand out for their unique features and performance. Here, we’ll explore the differences between these three antennas to help you make an informed decision.
Wolf River SB1000 Antenna
Features:
Type: Vertical HF Antenna
Frequency Range: Covers multiple HF bands (typically 10-80 meters)
Design: Portable and lightweight, making it suitable for field operations
Construction: Made from durable materials, often featuring stainless steel components
Pros:
Versatile: The SB1000 is designed to operate on multiple bands, giving you flexibility in your communications.
Easy Setup: Its portable design makes it easy to set up and take down, ideal for field use or portable operations.
Durability: Built to withstand various weather conditions, providing reliable performance over time.
Cons:
Size: While portable, it can be larger compared to other options, which might not suit all users.
Ground Plane Requirement: May require a proper ground plane for optimal performance.
MadDog 80 Coil
Features:
Type: Loaded Vertical Antenna
Frequency Range: Primarily designed for the 80-meter band but can operate on other bands with proper tuning
Design: Compact and easy to transport, often featuring a coil-based design for efficiency
Pros:
Compact Size: Its small form factor makes it easier to transport, especially for portable operations.
Efficiency: The coil design allows for effective tuning within the 80-meter band, providing good performance.
User-Friendly: Often comes with straightforward setup instructions, making it accessible for beginners.
Cons:
Limited Bandwidth: While effective on 80 meters, its performance on other bands may not be as strong compared to other antennas.
Lower Power Handling: May not handle high power levels as well as some larger antennas.
Rez 80 Antenna
Features:
Type: Horizontal or Vertical Antenna
Frequency Range: Designed primarily for the 80-meter band
Design: Known for its efficiency and low noise performance
Pros:
Low Noise Reception: The design often leads to less noise pickup, making it ideal for weak signal reception.
Versatile Installation: Can be set up as either a horizontal or vertical antenna depending on your needs and space.
Performance: Offers excellent gain and performance on the 80-meter band.
Cons:
Installation Complexity: May require more effort to install properly, especially if configuring for horizontal use.
Limited Multi-Band Capability: Primarily focused on the 80-meter band, which may not be ideal if you require multi-band functionality.
Which One Should You Choose?
Consider Your Needs:
If you need versatility: Go for the **Wolf River SB1000**. It’s excellent for multi-band operations and field use.
If you want a compact solution: The **MadDog 80 Coil** is great for portability and effective performance on the 80-meter band.
If low noise reception is a priority: Choose the **Rez 80 Antenna** for its efficient design and excellent performance on 80 meters.
Each antenna has its strengths and weaknesses, so your choice should align with your specific needs and operating conditions. Whether you’re a casual operator or a serious amateur radio enthusiast, understanding the differences between the Wolf River SB1000, MadDog 80 Coil, and Rez 80 antennas will help you make the best choice for your radio setup. Happy transmitting!

Embracing the Challenge: Why Run QRP During a POTA Activation?
For amateur radio enthusiasts, the thrill of communication is often magnified by pushing the boundaries of what's possible. One of the most fulfilling ways to do this is by running QRP (low power, typically 5 watts or less) during a Parks on the Air (POTA) activation. Here’s why you might want to consider this exciting combination for your next amateur radio adventure.
For amateur radio enthusiasts, the thrill of communication is often magnified by pushing the boundaries of what's possible. One of the most fulfilling ways to do this is by running QRP (low power, typically 5 watts or less) during a Parks on the Air (POTA) activation. Here’s why you might want to consider this exciting combination for your next amateur radio adventure.
Challenge and Skill Development
Running QRP is not just about reducing power; it’s about enhancing your skills. With limited power, you must optimize your antenna setup, choose efficient frequencies, and perfect your operating techniques. This challenge can significantly improve your understanding of radio propagation, antenna theory, and station setup.
Portability and Convenience
QRP rigs are often compact and lightweight, making them ideal for portable operations in parks. This portability allows you to easily carry your equipment to remote locations without the burden of heavy gear. Whether you’re hiking to a scenic overlook or setting up in a dense forest, QRP gear ensures you stay mobile and flexible.
Environmental Considerations
Using low power aligns with eco-friendly practices. Lower power consumption means less battery usage and a smaller environmental footprint. This can be particularly important in protected park areas where minimizing impact is key.
Community and Camaraderie
The QRP community is known for its camaraderie and support. By participating in QRP during a POTA activation, you join a group of like-minded operators who value skill and ingenuity over brute force. Sharing tips and experiences with fellow enthusiasts can enrich your amateur radio journey.
Cost-Effectiveness
QRP equipment is generally more affordable than high-power rigs. This makes it accessible for beginners or those looking to expand their setup without significant investment. Additionally, low power reduces the need for expensive power supplies and large antennas.
Propagation and Conditions Mastery
Engaging in QRP forces you to pay closer attention to propagation conditions. You’ll learn to take advantage of openings and understand the nuances of different bands, which can be incredibly rewarding when successful contacts are made.
Enhanced Satisfaction
There’s a unique satisfaction in making successful contacts over long distances with minimal power. Each QSO feels like a mini victory, a testament to your skill and the efficiency of your setup. For many, this sense of accomplishment is the ultimate reward.
Running QRP during a POTA activation is more than just a test of technical skill; it’s a journey into the heart of amateur radio’s spirit. By embracing the challenge, you not only enhance your capabilities but also deepen your appreciation for the art of communication. So pack your QRP rig, head to your nearest park, and experience the magic of low-power operation firsthand!

The Advantages of Operating Amateur Radio on the Beach or Coastline
For amateur radio enthusiasts, finding the perfect operating location can significantly enhance communication capabilities. One of the most rewarding places to set up your gear is at the beach or along the coastline. The unique environment offers several advantages that can improve your radio experience. In this blog post, we’ll explore the benefits of operating ham radio by the ocean and discuss how salt water plays a crucial role in enhancing radio transmissions.
For amateur radio enthusiasts, finding the perfect operating location can significantly enhance communication capabilities. One of the most rewarding places to set up your gear is at the beach or along the coastline. The unique environment offers several advantages that can improve your radio experience. In this blog post, we’ll explore the benefits of operating ham radio by the ocean and discuss how salt water plays a crucial role in enhancing radio transmissions.
Why Choose the Beach or Coastline?
Open Space and Minimal Interference: Beaches and coastal areas typically provide vast, open spaces free from urban clutter and electronic interference. This makes it easier to establish clear signals, as there are fewer obstacles that can obstruct radio waves.
Enhanced Propagation: The proximity to salt water can greatly enhance radio wave propagation. Coastal environments allow for better signal transmission and reception, which is crucial for reaching distant stations. The combination of the horizon and the ocean can create favorable conditions for both HF and VHF/UHF communication.
Relaxed Environment: Operating from the beach offers a serene and relaxing atmosphere that can enhance your overall operating experience. The sound of waves and the fresh ocean breeze can make for a refreshing break from the usual operating conditions.
Community Engagement: Beaches are often social hubs where fellow radio enthusiasts gather. This provides opportunities for meetups, contests, and spontaneous QSO (conversation) sessions, fostering a sense of community and camaraderie.
The Benefits of Salt Water for Transmission
One of the most significant advantages of operating amateur radio near the ocean is the presence of salt water. Here’s how it enhances your transmission capabilities:
Increased Ground Conductivity
Salt water serves as an excellent ground plane for radio waves. Its high conductivity helps improve signal strength and reduces loss during transmission. This is particularly beneficial for HF (High Frequency) bands, where ground conditions can greatly impact performance. The conductivity of salt water creates a better reflection of radio waves, allowing signals to travel further.
Enhanced Antenna Performance
When using antennas near salt water, operators often experience improved performance. The ocean acts as a natural reflector, allowing antennas to radiate signals more effectively. This is particularly true for dipole antennas or vertical antennas positioned close to the water, which can take advantage of the sea’s conductive properties.
Lower Noise Levels
Coastal areas often have lower ambient noise levels compared to urban environments. The combination of distant signals reflecting off the water and minimal interference allows for clearer reception. This is especially important for weak signal work, where every decibel counts.
Greater Range and Coverage
Salt water provides better propagation characteristics, which can significantly extend the range of your radio communications. Operators often report successful long-distance contacts (DXing) from coastal locations, making it an ideal spot for those seeking to connect with stations around the globe.
Practical Tips for Operating at the Beach
To make the most of your amateur radio experience at the beach, consider the following tips:
Choose the Right Time: Early mornings or late afternoons are often the best times for radio propagation, as conditions can be more favorable during these periods.
Use Portable Gear: Since beaches can be sandy and windy, opt for lightweight, portable gear that’s easy to set up and pack away.
Secure Your Equipment: Ensure your radio and antennas are securely anchored to prevent damage from wind or waves.
Stay Hydrated and Protected: Remember to bring water and sun protection, as operating for extended periods in the sun can be draining.
Operating amateur radio at the beach or coastline offers a unique and rewarding experience for enthusiasts. The combination of open space, minimal interference, and the benefits of salt water can significantly enhance your communication capabilities. Whether you’re seeking to make long-distance contacts, enjoy a relaxed operating environment, or connect with fellow hams, the beach is an ideal location for your next radio adventure.
So pack your gear, head to the coast, and enjoy the waves—both in the ocean and on the air!

Why You Should Consider Setting Up an AllStar Link
AllStar Link is a network of amateur radio repeaters, remote base stations, and hotspots that allows for voice communication using Voice over Internet Protocol (VoIP) technology. In this blog post, we'll explore the reasons why you should consider setting up an AllStar Link and the benefits it can bring to your amateur radio activities.
Are you looking to expand your amateur radio hobby or improve communication capabilities in your community? If so, setting up an AllStar Link might be the perfect solution for you. AllStar Link is a network of amateur radio repeaters, remote base stations, and hotspots that allows for voice communication using Voice over Internet Protocol (VoIP) technology. In this blog post, we'll explore the reasons why you should consider setting up an AllStar Link and the benefits it can bring to your amateur radio activities.
1. Enhanced Communication Range
One of the primary reasons to set up an AllStar Link is the increased communication range it offers. By connecting your local repeater or hotspot to the AllStar Link network, you can communicate with other users and nodes around the world. This extended range can be especially beneficial during emergencies or when traditional communication methods are unavailable. AllStar Link essentially enables you to create a global network of communication nodes, enhancing the reach of your amateur radio activities.
2. Flexibility and Versatility
AllStar Link is known for its flexibility and versatility. It supports various hardware platforms, including low-cost single-board computers such as the Raspberry Pi, as well as more powerful systems. This means that you can set up an AllStar Link node using equipment that fits your budget and technical expertise. Additionally, AllStar Link is compatible with both analog and digital radio systems, allowing you to integrate it into your existing setup without the need for significant upgrades.
3. Community Building and Collaboration
By participating in the AllStar Link network, you become part of a larger community of amateur radio enthusiasts. This provides opportunities for collaboration, knowledge sharing, and learning from others with similar interests. AllStar Link also facilitates the creation of private networks, enabling local clubs, emergency services, and special interest groups to establish their own communication systems within the broader network.
4. Emergency Communication Preparedness
Amateur radio operators play a crucial role in providing communication support during emergencies and natural disasters. Setting up an AllStar Link node can contribute to the overall preparedness of your community by establishing an alternative communication infrastructure. In times of crisis, when traditional communication channels may be disrupted, AllStar Link can serve as a reliable means of coordinating relief efforts, sharing critical information, and maintaining contact with emergency services.
5. Learning Opportunities
For those interested in technology and telecommunications, setting up an AllStar Link node can be a valuable learning experience. It provides an opportunity to delve into the technical aspects of VoIP, networking, and radio communication protocols. Whether you are a seasoned amateur radio operator or a newcomer to the hobby, the process of configuring and maintaining an AllStar Link node can help you expand your knowledge and skills.
In conclusion, setting up an AllStar Link node offers a range of benefits, from extended communication range and community building to emergency preparedness and learning opportunities. Whether you are an individual enthusiast, a radio club, or an organization involved in emergency response, AllStar Link can enhance your amateur radio activities and contribute to the overall resilience of your community. If you're passionate about amateur radio and eager to explore new possibilities, consider joining the AllStar Link network and experience the advantages it has to offer.
My POTA Kit
I am creating a blog series on My POTA Kit. This is my main activation setup and all the ins and outs of my setup.
So I’ve been doing POTA for over two years now with over 5000 contacts and over 156 parks activated under my belt. I have been able to work out my “go bag,” so I can easily setup in under 5 minutes - including the antenna.
So now that I have this blog to chronicle my radio adventures, I decided I might be able to share some of my experience and get you out and activate a park.
Now let me frame this topic a bit…
The goal of my setup is to get an activation setup within 5 minutes or less. I drive a lot for work, so the opportunity to activate a park between client visits sometimes is live a RADAR for me.
A setup that quickly maintains the line of efficiency makes things very easy to get up and running.
This is the difference between a successful activation and a failed attempt, as the airwaves can be challenging no matter how good your setup is.
I am fortunate to get the opportunity to activate new parks. This, for me, requires some quick scoping out and locating a spot.
My Setup
So with my setup, I have the non-negotiables.
Black mesh zipper bags - This stores all cables, flexible ties, connectors, antennas, interfacing coax, and radios. These are the ones ladies use for makeup items. You can find them on Amazon.
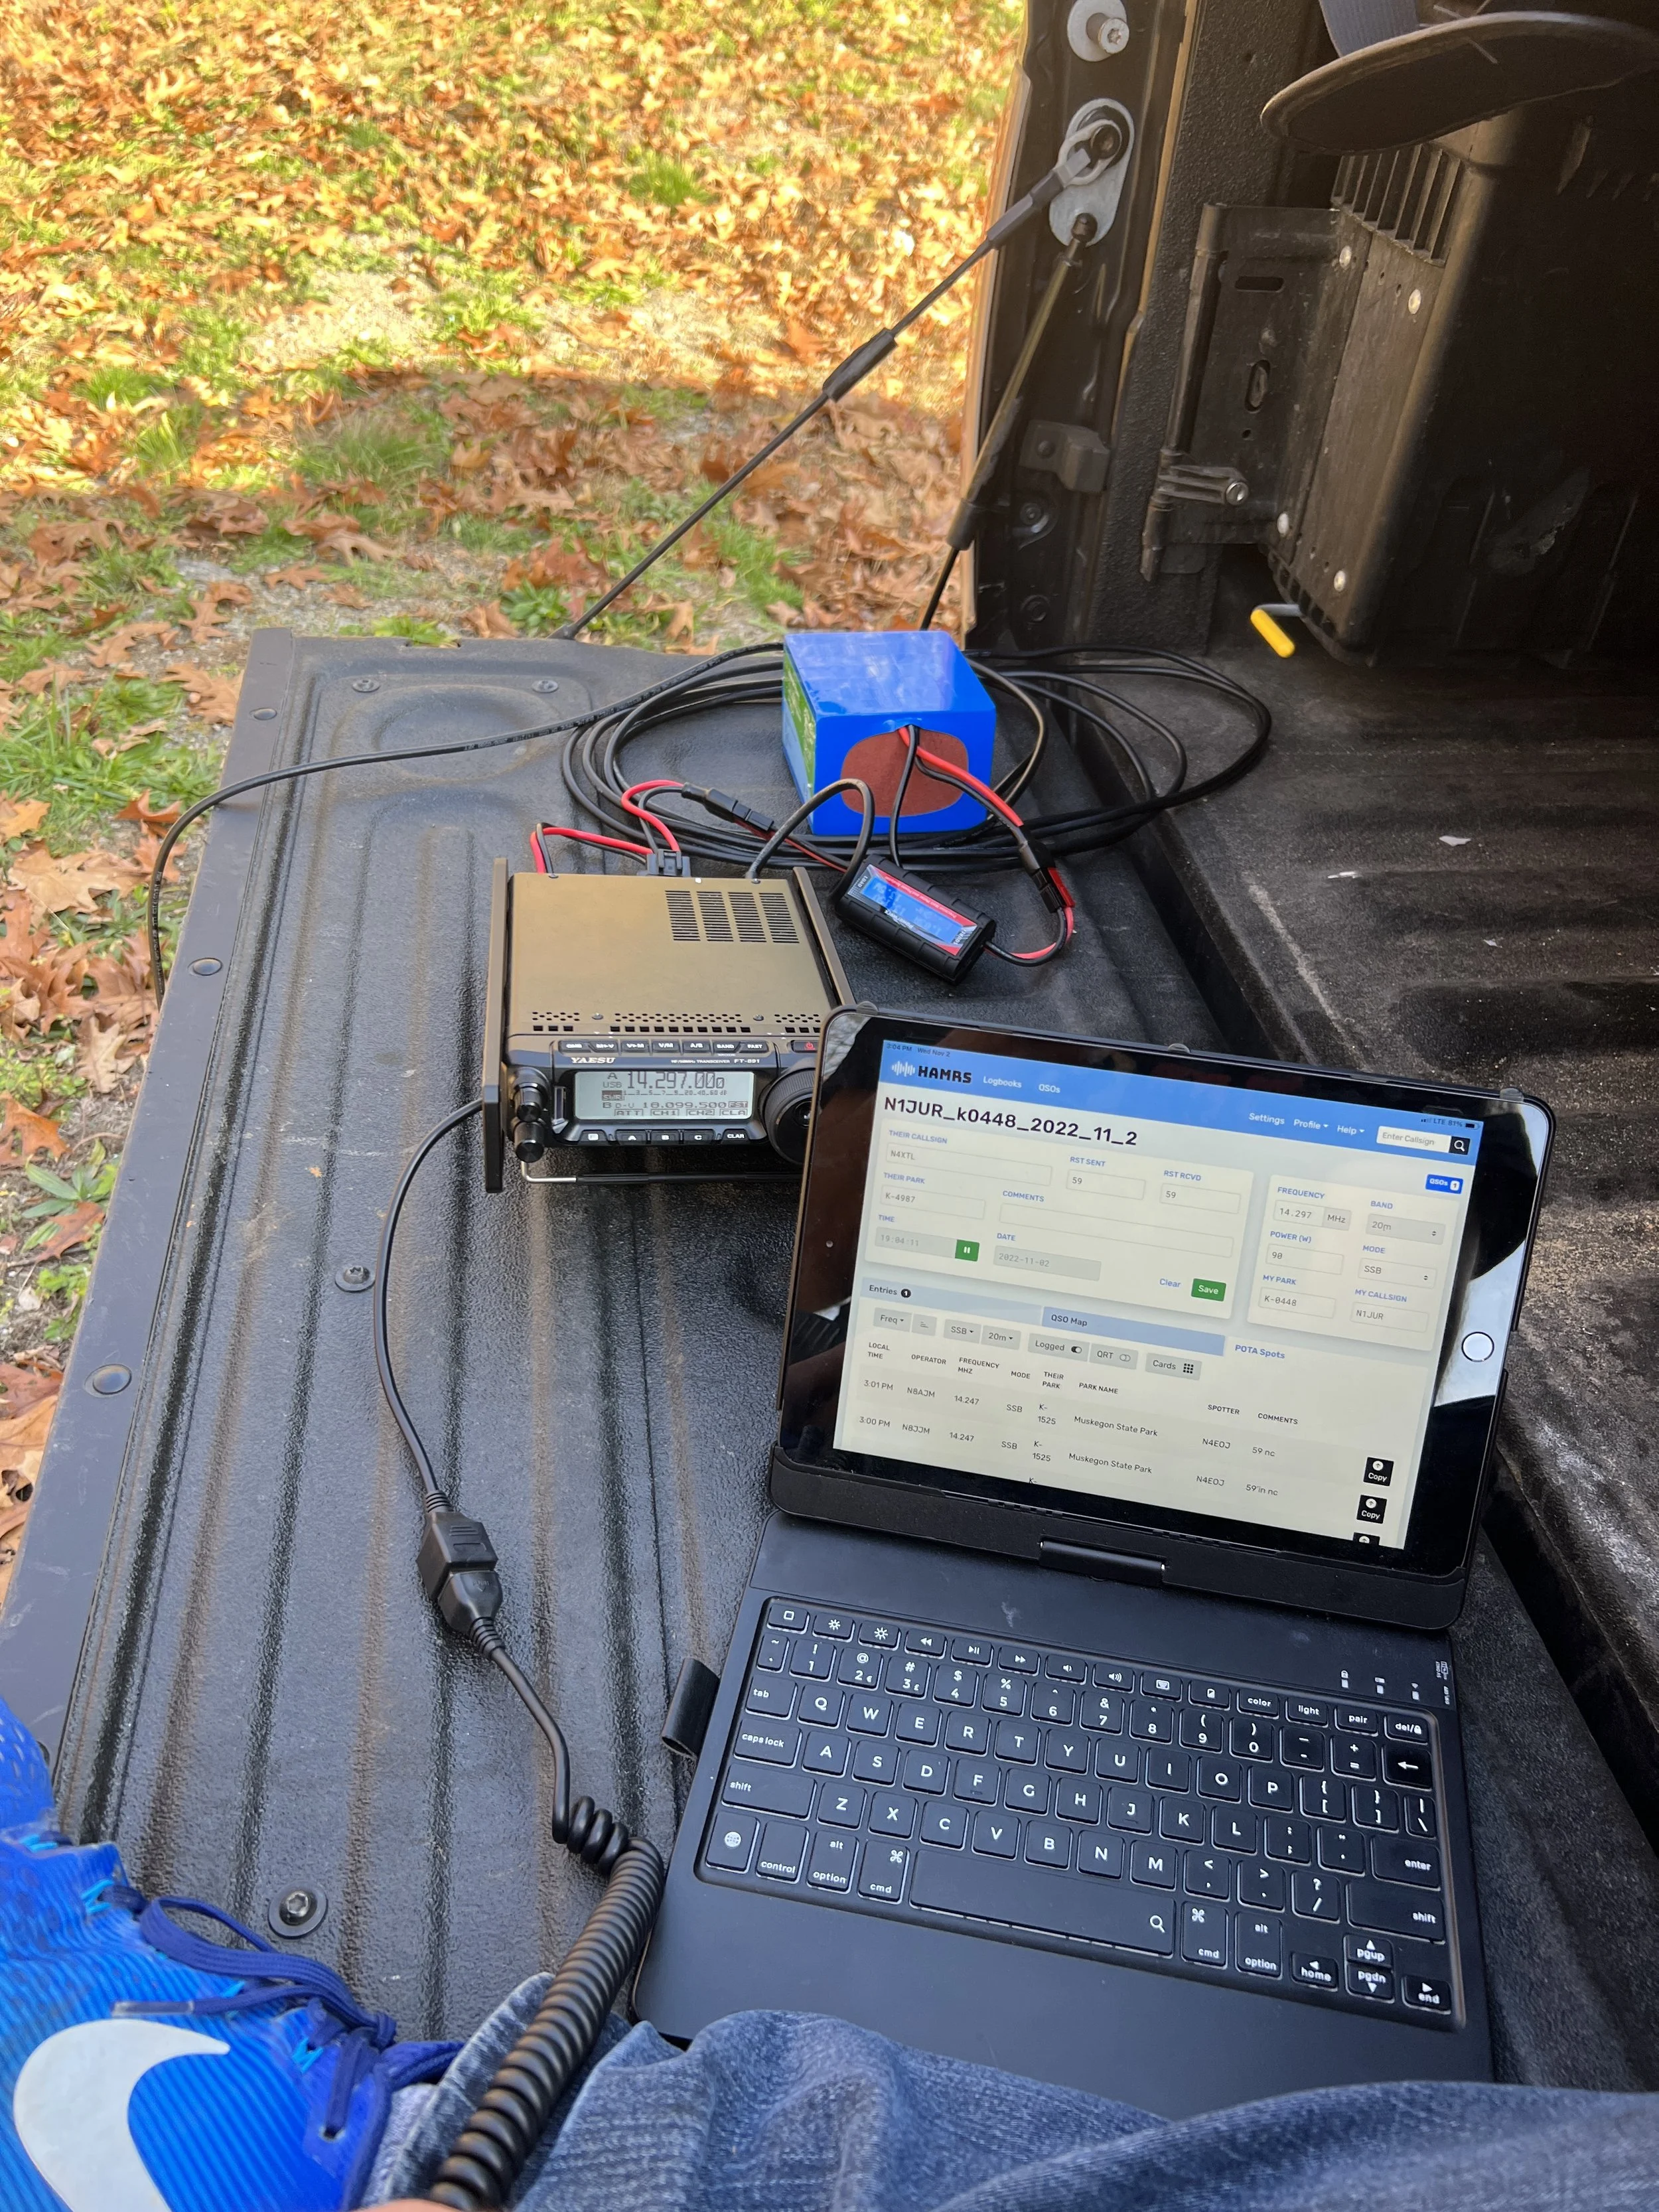
Radio Bag- I have an Oakley Mail Currier bag - which is no longer made) that houses my radio, logging tablet, battery, power cords, and watt meter. The fold-over zipper case has additional zippered storage where my zipper pouches are all organized. I also have a Rig Expert Stick 230 and Powerwerks in-line watt meter to round out the bag.
I carry a pen and yellow stick-its, a 2-way mike splitter - for dual activations, a Digi Rig, and charging cables for the smartphone.
Everything in the bag is power poles and provides easy use when I need to cable power together.
The Logging Computer - I have two devices. I use an iPad with a Bluetooth keyboard for regular logging - an on/off switch is a must! If you can afford it, I would get the iPad with cell, as it makes it easy to do callsign lookups and synch the log.
I am in the process of building a computer for digital modes. But for this post, I saved that for another post as a video would help explain the process.
I use HAMRS for logging and Dropbox to sync my logs. My process is simple: setting up the log file in HAMRs and exporting the ADI file to Dropbox. When I get home, I open up the log file with ADIF Master, confirm all fields, park, and other items are in check, and then upload the file to the POTA.APP website for processing. Then, to give proper credit to the hunters, I created a profile on Ham Radio Deluxe for the park, ensuring the Grid Square is correct for the location profile of the park and imported the log file. HRD then does the heavy lifting for QRZ and LOTW.
Antennas
I can go into greater detail on these antennas - and will at a later date, but I’ll list them here to explain my kit. I do have many so let me explain
Spring/Summer/Fall Activations -
I use a combination of two antennas. My first go-to antenna is the Wolf River Coil TIA 1000, with the center-loaded section. I use the 24” base and have the dual collar option.

I use a combination of two antennas. My first go-to antenna is the Wolf River Coil TIA 1000, with the center-loaded section. I use the 24” base and have the dual collar option.
I also have a Buddiepole Pro, and this antenna doesn’t get a lot of use as sometimes the counterpoise can be finicky and need more attention to get set up. I do have to give this antenna more field time in the spring.
Winter/Cold Activations -
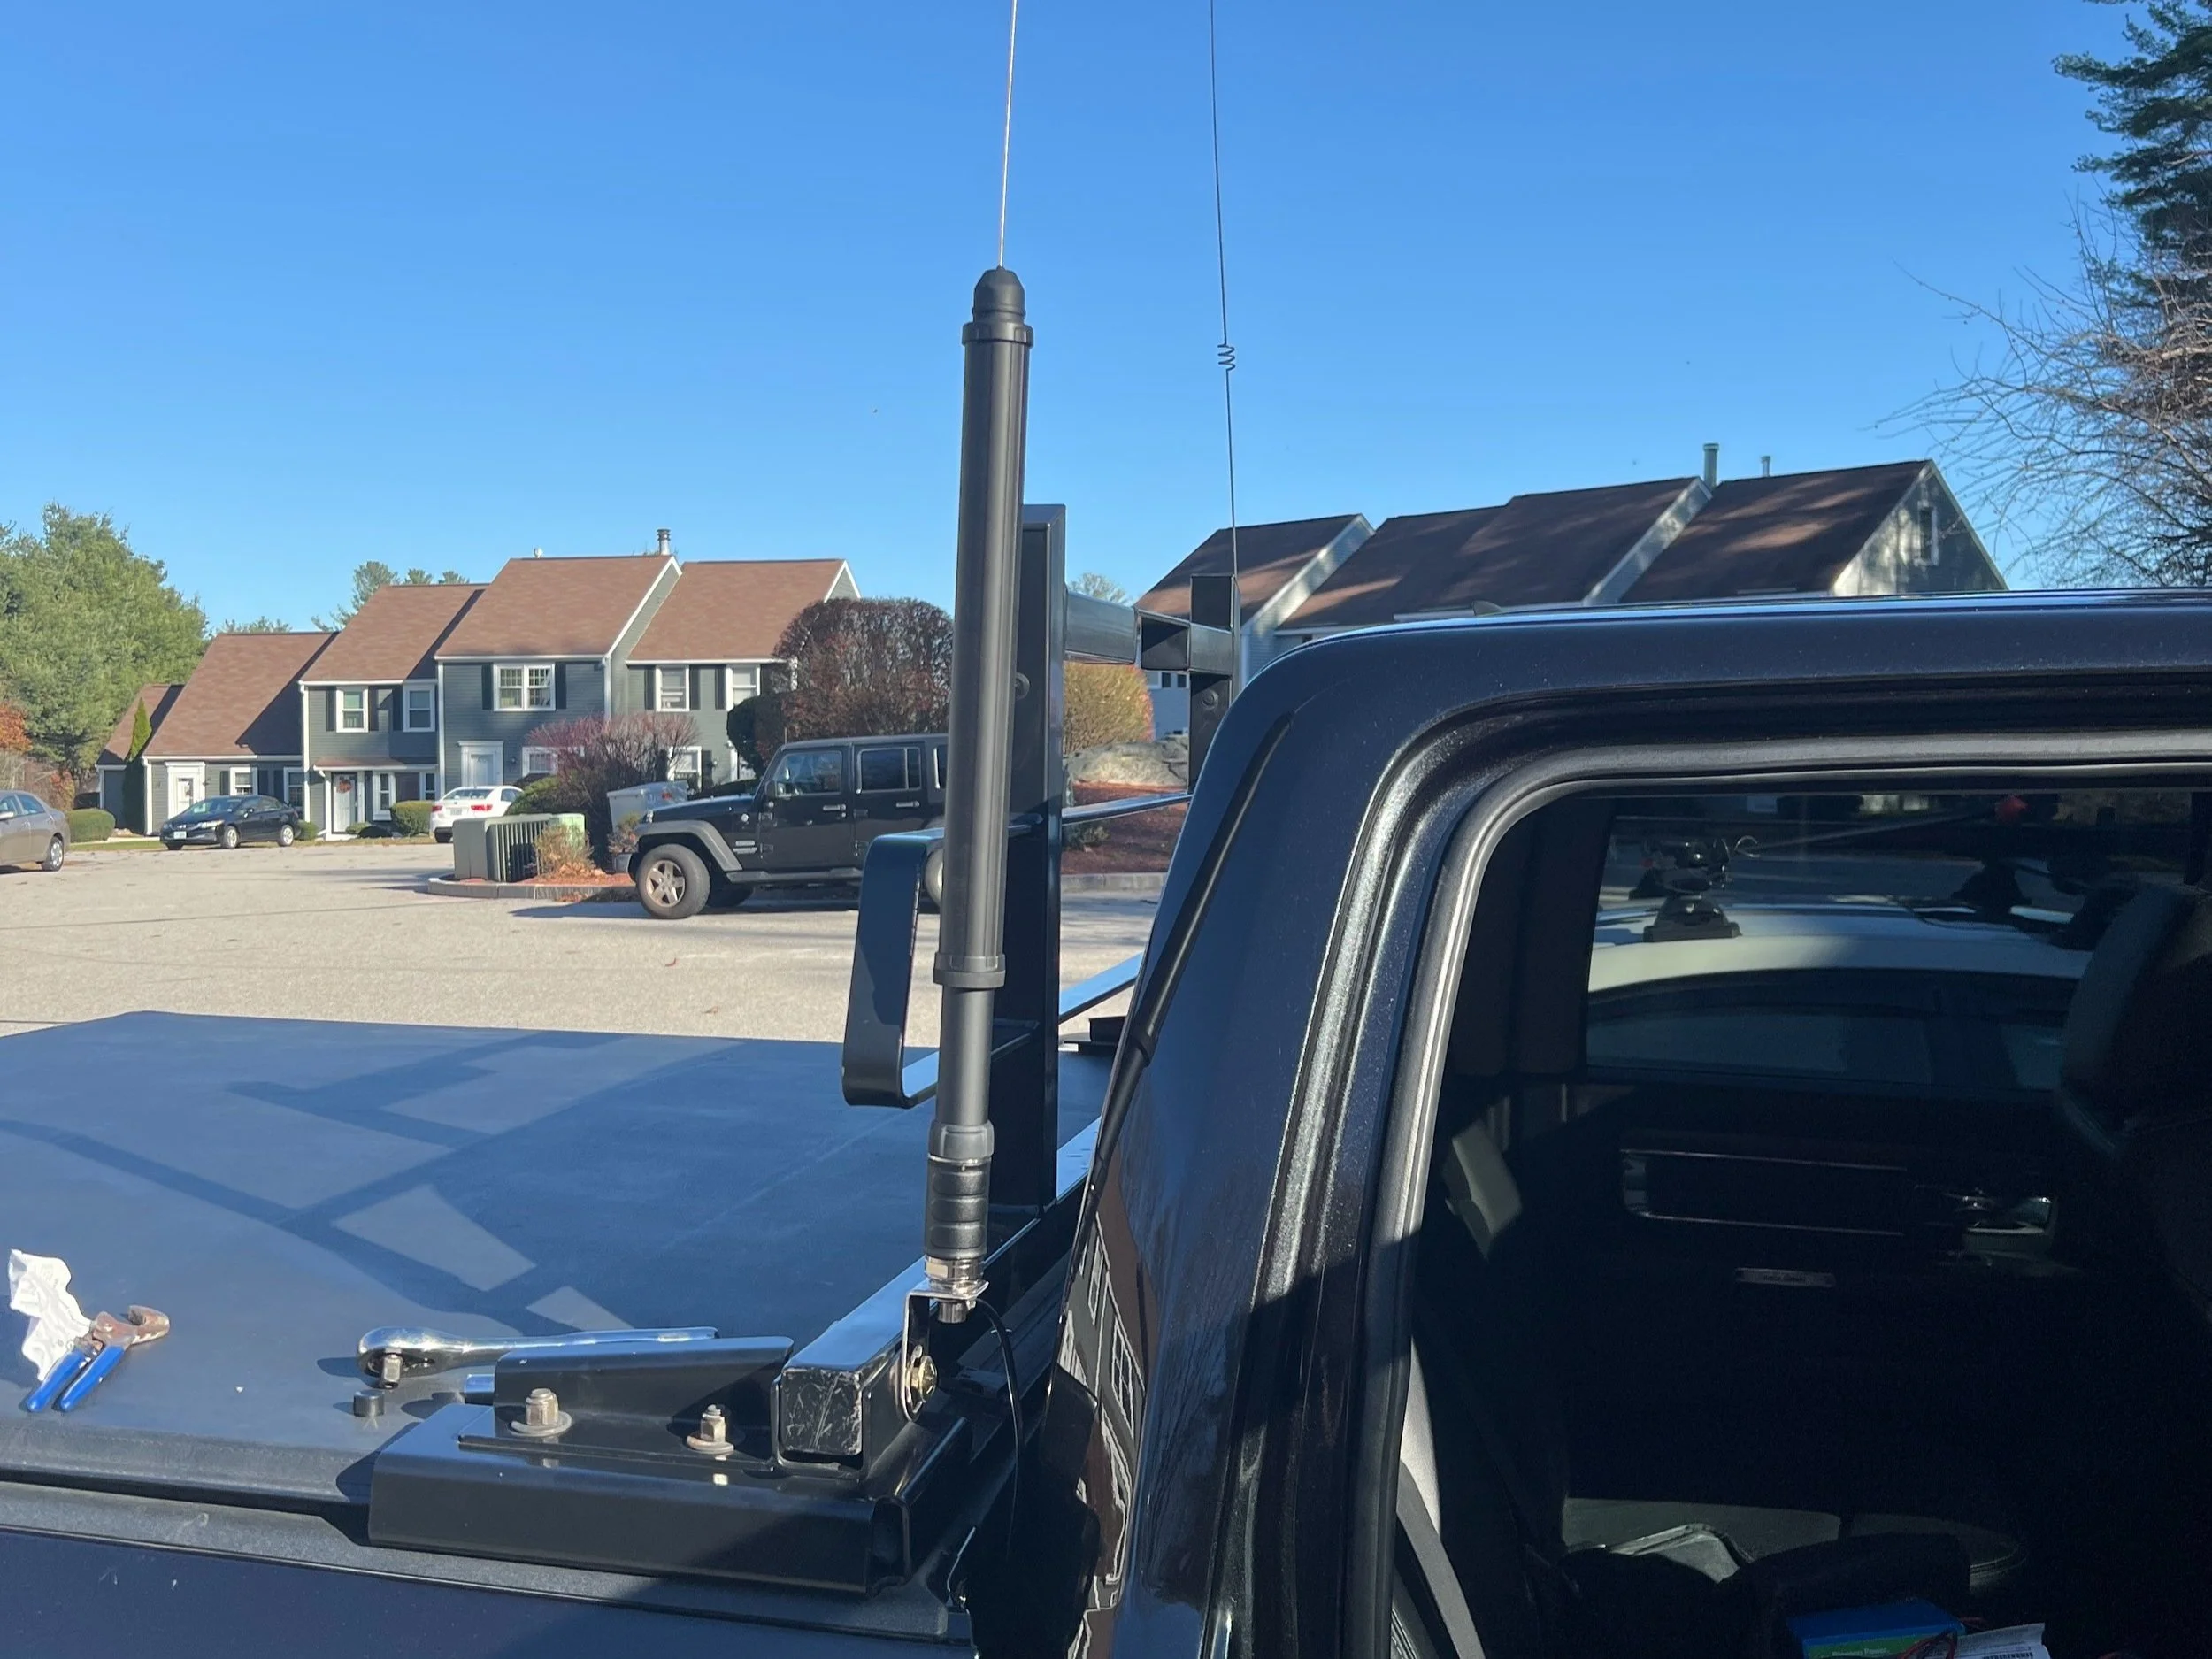
I do most, if not 90%, of my activations in the winter from my truck. I purchased in the spring of 2022 a Yaesu ATAS 120a and mounted this to my back rack.
I run a few wire antennas, with the Chameleon EFLFS 80-10 Lightweight Sloper being the one I use mostly. I plan to do some additional reviews on these at a later date. But I have used this once at a POTA Meetup with success and on several Field Day events.
Batteries
I haven’t tried the gamut of batteries out on the market, but my stable includes a 15-ah and 20-ah Bioenno battery. Both of these are charged using the Bioenno charging plugs, and I have never run out of power. I have a solar charge controller from Buddipole (Powermini 2) and a 60-watt panel. Still, I haven’t taken the time to assemble this kit with a 60-watt solar panel, but it will be forthcoming.
I know I can go further into the rabbit hole, but this is an excellent place to ask… What do you want to know about my setup?
I plan on posting more videos on YouTube and social media, and you can always come back to my site for the latest updates.
My question to my visitors is, what you’d like to know more about? My antennas? Setup? The tech? Let me know in the comments.