
Field Notes from N1JUR
Real-world ham radio tips, portable operating lessons, gear thoughts, and activation stories from the field to the shack.
What You’ll Find Here
This blog is where I go deeper than a YouTube description. You’ll find practical ham radio guides, activation lessons, gear breakdowns, and field notes from real operating experiences.
Some posts are beginner-friendly. Some get a little more technical. And some are just honest lessons from the field — because not every activation goes perfectly, and that’s usually where the good stuff happens.
Portable operating tips
POTA, SOTA, and location-based activation ideas
Gear and antenna experiments
Beginner-friendly ham radio guides
Field stories and lessons learned
The 20-Minute End-Fed Half-Wave: A Garage-Built Antenna That Punches Above Its Weight
The first antenna I bought for POTA cost me $75 and worked fine. The second antenna I built in my garage for about $18 in parts and worked better. I'm not saying that to sound clever — it's just how it went, and it's a pretty common story. The end-fed half-wave antenna is one of the most forgiving, portable, and genuinely effective antennas you can put up in a park. And if you build your own, you'll know exactly what's in it, which pays off every time something needs troubleshooting.
The first antenna I bought for POTA cost me $75 and worked fine. The second antenna I built in my garage for about $18 in parts worked better. I'm not saying that to sound clever — it's just how it went, and it's a pretty common story. The end-fed half-wave antenna is one of the most forgiving, portable, and genuinely effective antennas you can put up in a park. And if you build your own, you'll know exactly what's in it, which pays off every time something needs to be troubleshot.
Here's how to build one in about 20 minutes. I mean that literally — if you've got the parts on hand, I've timed it.
Why the EFHW Works So Well for Portable
The end-fed half-wave is resonant on a specific band (or its harmonics) without needing a tuner. A wire cut to half-wavelength on 40m — about 66.5 feet — is also resonant on 20m, 15m, and 10m. That means one antenna covers four bands, which is a big deal when you're trying to stay light and fast. You feed it at the high-impedance end (roughly 2,500-5,000 ohms) through a 49:1 transformer that steps the impedance down to something close to 50 ohms that your radio can see.
The alternative — a center-fed dipole — is great but requires a feedpoint in the middle of the wire, which complicates deployment. An EFHW lets you run all your coax back to the operating position and mount the transformer at the base of your mast. Much cleaner setup when you're working solo.
One thing to understand: the EFHW needs a counterpoise. Not a big one — typically 0.05-wavelength is enough, which on 40m is about 3 feet. A lot of commercial EFHW designs use the coax shield as the counterpoise, which works reasonably well if your coax is at least 20-30 feet. A small wire counterpoise clipped to the transformer chassis ground lug is more predictable and something I'd recommend adding if you're building from scratch.
Parts List
Everything you need for the transformer and feedpoint:
1x FT140-43 ferrite toroid core (about $5-7 from Mouser or KitsAndParts)
26 AWG or 24 AWG magnet wire (enameled copper), roughly 6 feet — you likely have this already
Enclosure: a small Hammond 1590A die-cast aluminum box ($5-8) or a PVC project box
SO-239 chassis connector for the radio side ($2-3)
Wing nut or binding post for the wire connection
1/8" stainless bolt + nut for the counterpoise lug
Small capacitor, 100pF 500V (optional but recommended — improves 10m performance noticeably)
For the wire:
66.5 feet of 26 AWG stranded hookup wire or antenna wire for 40m resonance (cut slightly long, then trim)
For a lighter build, some people use 28 AWG — fine for 100W if you don't run it into high SWR
Total cost in parts: roughly $15-20, depending on what you already have.
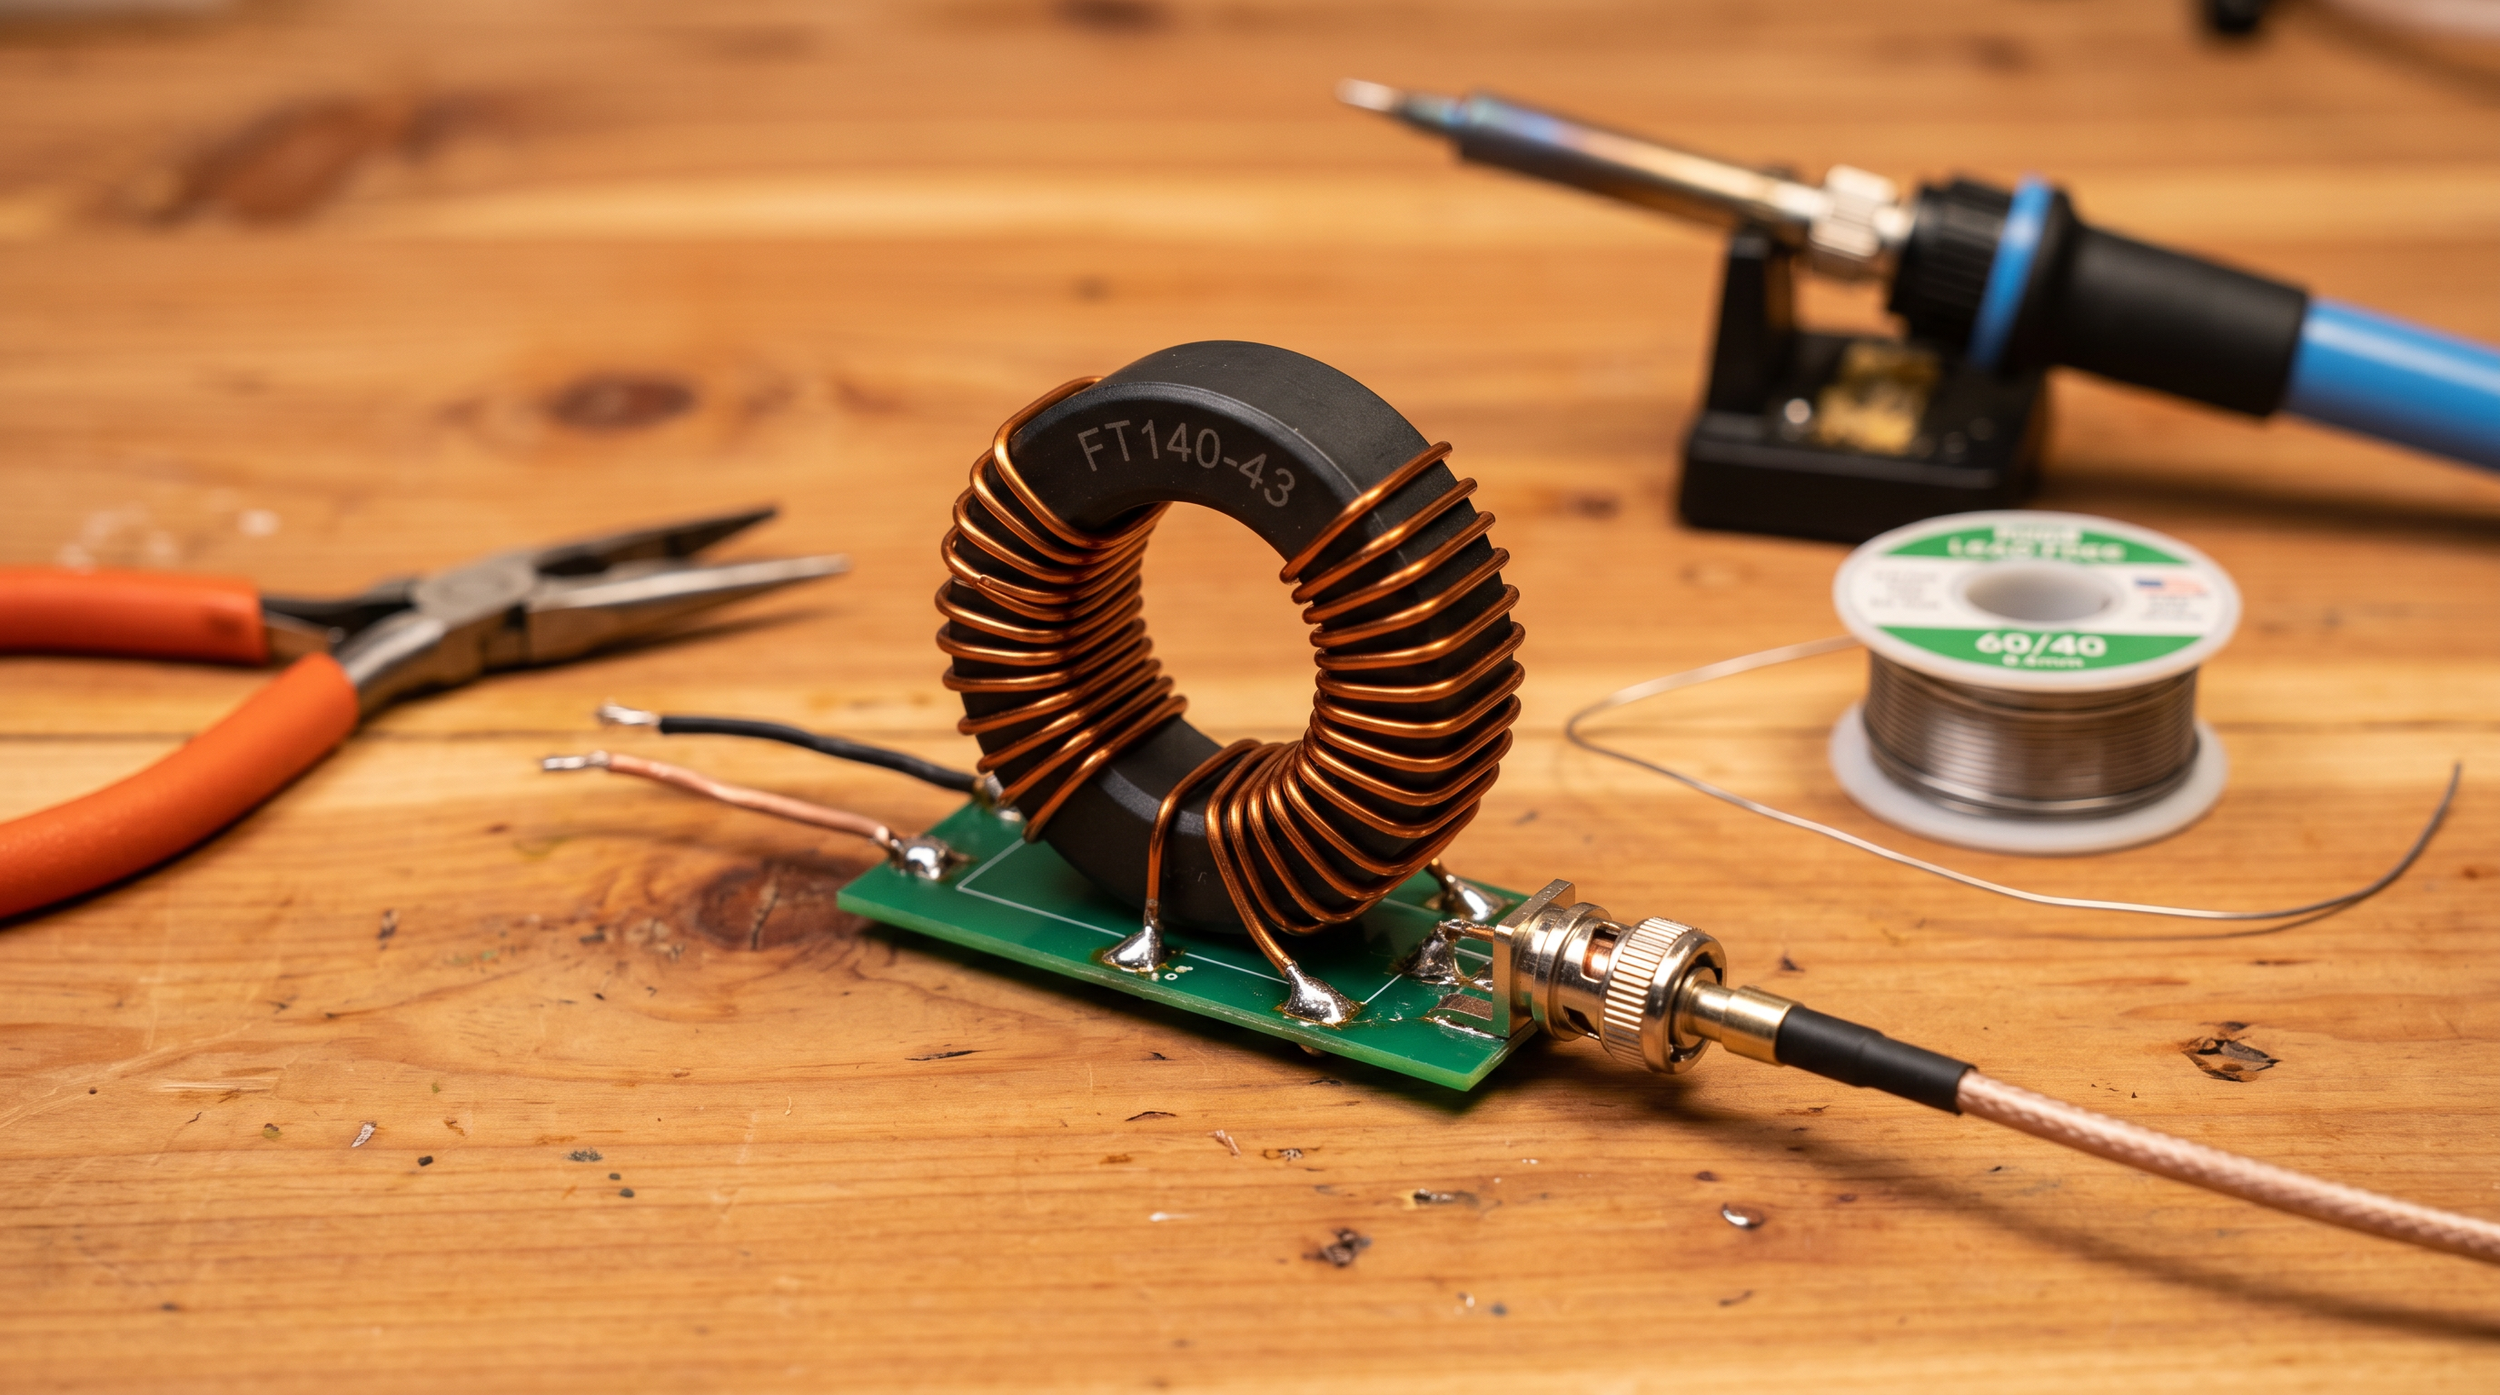
Winding the 49:1 Transformer
The 49:1 ratio comes from a turns ratio of 7:1 — 7 turns on the primary (radio side), 49 on the secondary (antenna wire side). On an FT140-43 core, the winding process takes about 10 minutes if you're patient.
Primary Winding
Strip and tin your 24 AWG magnet wire. Wind 7 turns through the center of the FT140-43 core. A "turn" means the wire passes through the hole once — count hole passes, not wraps around the outside. Space the turns evenly and keep them tight against the core. Connect one end to the center pin of your SO-239 and the other end to the ground lug.
Secondary Winding
For the secondary, you need 49 turns. This sounds tedious, but it isn't bad on the FT140-43, since the core is large enough to accommodate the wire comfortably. Use the same 24 AWG wire. Wind in the same direction as the primary. One end goes to the antenna wire connection (binding post or wing nut), the other end goes to ground, same as the primary cold end. The shared ground point between primary and secondary is important — don't skip it.
The Optional Capacitor
Solder a 100pF 500V capacitor across the primary (between the center pin and ground on the SO-239 side). This resonates out some of the transformer's leakage reactance at 10m and 15m and measurably improves your SWR on those bands. It doesn't affect 40m or 20m performance. Worth doing while you've got the iron out.
Enclosure and Finishing Up
If you're using a Hammond 1590A box, drill a hole for the SO-239, a hole for the antenna wire to exit, and a small hole for the counterpoise connection. Use a chassis punch or a step drill bit. Mount the SO-239, run the transformer inside, and secure the core with a small dab of non-conductive epoxy or a zip tie through a cable clamp — you don't want the toroid bouncing around inside the box over rough terrain.
Seal the antenna wire exit with a grommet or a dab of silicone to keep moisture out. Label the box with a marker: band, transformation ratio, and build date. You'll thank yourself in 18 months.
For the wire itself, I use 26 AWG silicone wire — it's flexible, doesn't retain a memory set in the cold, and coils neatly onto a fishing winder or a small cord winder. The silicone jacket is also noticeably tougher against bark and branches than standard PVC hookup wire.
Installing and Testing
Before you go to the park, hook a NanoVNA to the SO-239 and sweep 7 to 30 MHz with the antenna wire deployed (or at least fully extended in your garage or yard). You're looking for the SWR dip on 40m to land somewhere in the 7.000-7.300 MHz range, and dips on 20m, 15m, and 10m that correspond to harmonics.
If your 40m dip is below 7.0 MHz, the wire is a little long — trim 6-inch increments from the far end, re-measure, repeat. If the dip is above 7.3 MHz, the wire is short, and you'll need to add a few inches. This tuning process is genuinely satisfying — you're watching the antenna respond to physical changes in real time.
What "Good Enough" SWR Looks Like
At the 40m dip, you want SWR below 1.5:1 without a tuner. Below 2:1 is acceptable if you've got an internal tuner in your radio. If you're seeing 3:1 or worse with the wire fully deployed, double-check that both the primary and secondary cold ends are properly grounded to the same point — that's the most common winding error.
How It Performs in the Field
Honest answer: It performs like a real antenna. I've made contacts on 40m SSB into the Pacific Northwest from New Hampshire on 100W with this antenna, slung at about 25 feet on a crappie pole. The 20m performance is excellent — the EFHW's harmonic resonance on 20m is genuine, and you don't take a big efficiency hit.
Compared to a commercial antenna like the PAR EndFedz or the LNR Precision Trail-Friendly end-fed, a good homebrew 49:1 on an FT140-43 will hold its own. The FT140-43 core handles 100W without heating up under normal operating conditions. I've run a continuous 5-minute carrier at 100W during testing, and the core stayed barely warm. For POTA-style operating — short transmit bursts, long receive windows — heat is essentially a non-issue.
Watch & Learn
If you want to see the EFHW concept in action before you start winding, here's what to queue up:
- [BEST portable QRP antenna (JUST OK MINI)](https://www.youtube.com/watch?v=6rVIJCYvbDY) — a hands-on look at portable antenna performance in the field, including how EFHW-style antennas compare to alternatives
- [POTA Tips, Tricks & Hacks (N1JUR)](https://www.youtube.com/watch?v=4eRNNE5tLfw) — antenna deployment tips baked into a broader activation walkthrough
Go Build It
Honestly, the hardest part is ordering the toroid. Once the FT140-43 shows up in your mailbox, you'll have the thing wound, tested, and ready to go in an evening. And there's something satisfying about making 40 contacts on an antenna you built yourself for less than the cost of lunch.
Questions about winding, enclosures, or matching — come find me in the Brew & Activate Discord at [discord.gg/zwg9mWyHmY](https://discord.gg/zwg9mWyHmY). The build-your-own-antenna crew in there is genuinely helpful and not snobby about it. More antenna content and activation guides over at [n1jur.com](https://n1jur.com).

Your First POTA Activation: A Lazy-Sunday Starter Kit That Just Works
You've had your license for a few months. Maybe you've done some repeater work, chatted on a local net, maybe made a couple HF contacts from your living room. And then somebody mentions Parks on the Air and suddenly you're down a rabbit hole at midnight reading activation reports and thinking — okay, I need to do this. The problem is nobody hands you a checklist that says exactly what to bring and exactly what to do. So let me be that person. Here's the honest, no-fluff starter kit for your very first POTA activation.
You've had your license for a few months. Maybe you've done some repeater work, chatted on a local net, maybe made a couple HF contacts from your living room. And then somebody mentions Parks on the Air and suddenly you're down a rabbit hole at midnight reading activation reports and thinking — okay, I need to do this. The problem is nobody hands you a checklist that says exactly what to bring and exactly what to do. So let me be that person. Here's the honest, no-fluff starter kit for your very first POTA activation.
What POTA Actually Is (and Why It Hooks You Fast)
Parks on the Air is a program where ham radio operators make contacts from designated parks, forests, wildlife refuges, historic sites — basically any publicly managed outdoor space that's on the POTA list. You log at least 10 contacts from a single park, upload the log, and it counts as an "activation." The other side of that coin is "hunting" — where operators at home work activators in the field.
What makes it addictive isn't the points. It's the combination of fresh air, radio, and the fact that people are genuinely excited to work you. The moment you self-spot on the POTA website and call CQ, you'll have callers lined up inside 60 seconds on a good day. It feels like magic the first time. And honestly, it still feels like magic on your 50th activation.
The barrier to entry is lower than you'd think. You don't need a fancy rig, you don't need a tower, and you don't need to be a CW wizard. A general license, a modest HF radio, and a wire antenna will get you there.
The Radio: Keep It Simple to Start
For a first activation, you want something you already know how to operate under mild stress. This isn't the time to pull out a radio you just unboxed. If you've got a Yaesu FT-891 or an Icom IC-7300 sitting at home, either of those will do the job fine in the field. The FT-891 in particular is a popular portable choice — it runs 100W on a reasonable current draw, it's compact, and the controls are intuitive once you've spent a few hours with it.
If you're budget-shopping, don't overlook the FT-891 used market — they go for around $450-$550 in good shape and are pretty hard to kill. You can also get into QRP territory with something like an Xiegu G90 (about $400 new), which runs 20W and has a built-in tuner that handles a lot of antenna mismatch sins.
One tip that saves beginners a lot of headaches: set the radio up at home the night before and actually transmit into a dummy load. Make sure your audio sounds good, your keyer is set, your power level is where you want it. The park is not the place to discover you've got RF feedback or the wrong mic setting.
The Antenna: Just Bring Wire
A lot of first-timers overthink the antenna. Here's what I'd recommend for your first outing: a simple end-fed half-wave (EFHW) wire antenna, either a commercial one like the BuddiStick or a SOTAbeams product, or a homebrew version you wind yourself. The EFHW runs resonant on 40m (about 66 feet of wire) or 20m (about 33 feet), doesn't need a tuner if it's cut right, and you can deploy it a dozen different ways — sloped off a tree, as a sloper from a 20-foot Jackite or Spiderbeam mast, or even as an inverted L.
For the mast, a 20- to 33-foot fiberglass crappie pole or a Jackite pole works great. They weigh almost nothing, fit inside a backpack, and stake into the ground with a tent stake and a bungie cord. Bring extra bungie cords. You'll always need one more than you think.
The wire itself — if you're winding your own counterpoise or feedline — use 26 AWG or 28 AWG stranded wire for the antenna radiator if you want something light and packable. For any leads that see mechanical stress, step up to 22 AWG. The difference in weight matters when you're carrying it a half mile.
The Power: Don't Get Clever on Day One
Bring a known, fully charged battery. That's it. For a first activation where you're running 100W, a 20 Ah SLA battery will get you through a 2-hour session without drama. Yes, it weighs about 12 pounds, which is annoying. But it's cheap, reliable, and you don't have to worry about cell balancing or charge voltages or any of that on your first day out.
Use Anderson Powerpole connectors if your radio has them — they're the standard in the POTA/SOTA world and make connecting and disconnecting clean. If your radio came with a cigarette-lighter adapter or bare leads, spend the $20 to crimp on a set of Powerpole connectors before you go.
Bring a small multimeter or a battery voltage monitor that plugs into your Powerpole leads. Watching voltage under load tells you a lot — 12.6V at rest and 12.0V under TX is healthy. If you're seeing 11.5V under TX, start wrapping up.
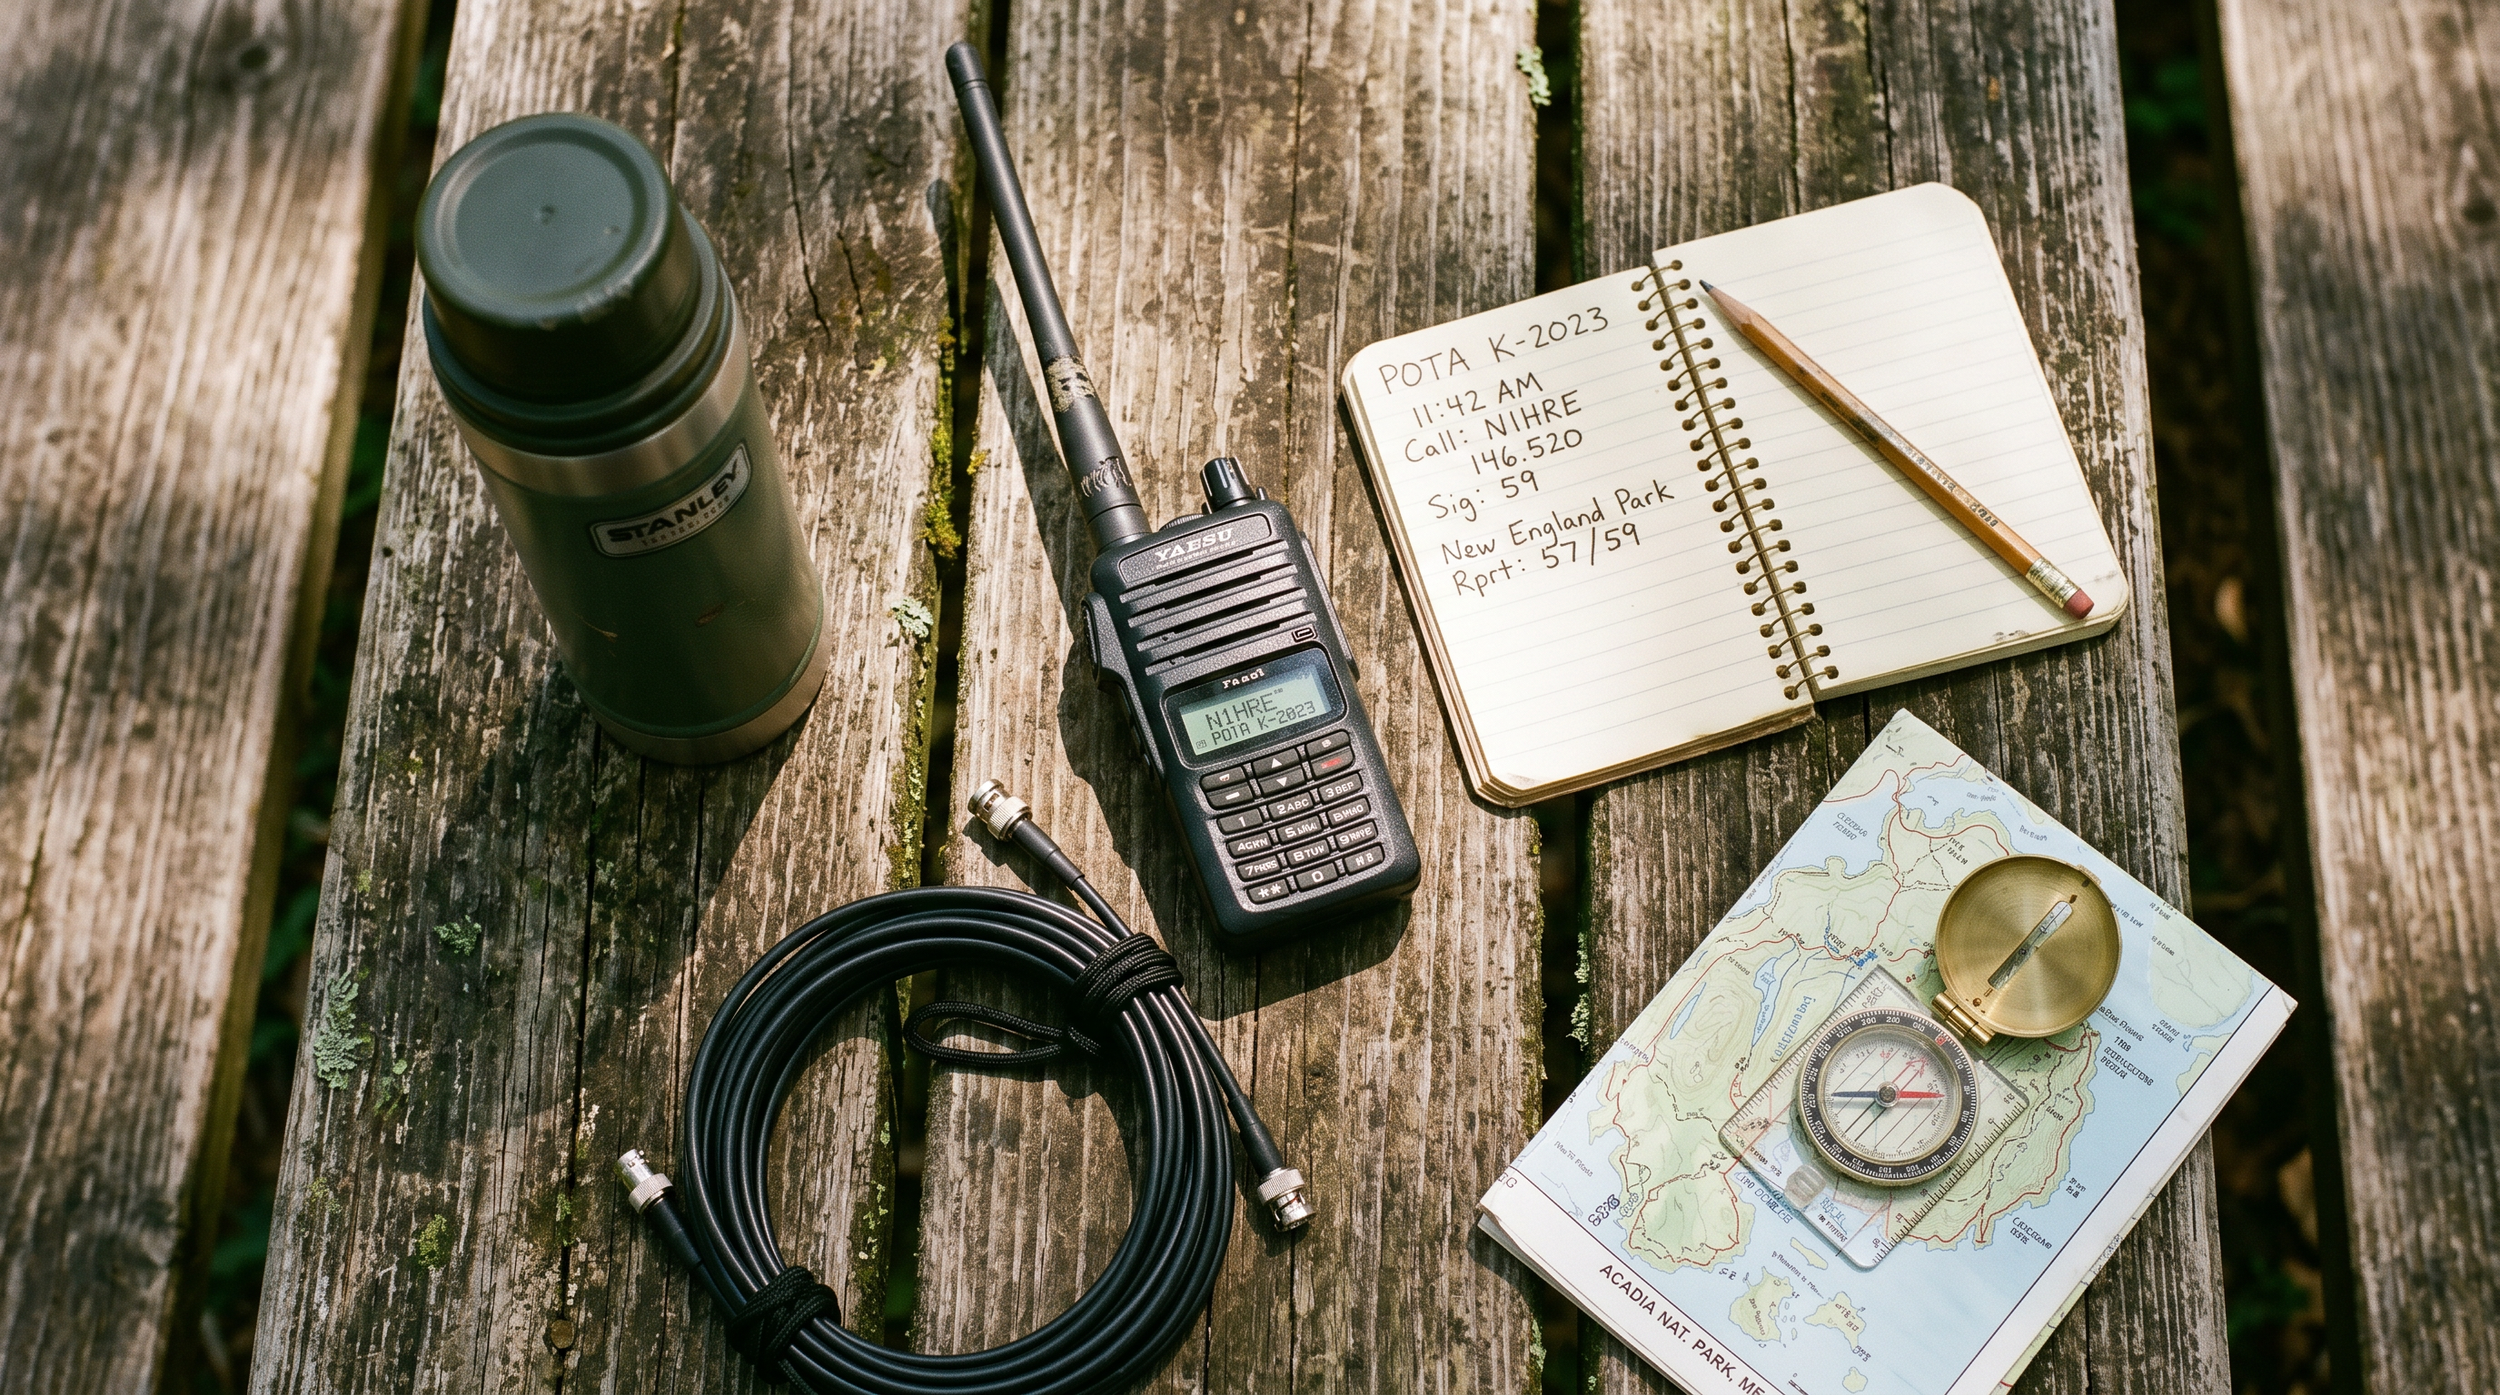
The Log: Paper First, Digital Later
For your first activation, log on paper. Seriously. A spiral notebook and a pencil — not a pen, because cold and wet happen — is bulletproof. The required fields for a POTA log are: date, time (UTC), band, mode, and callsign of the station worked. That's it. You can also add a signal report if you want, but it's not required for upload.
After the activation, you'll enter those contacts into ADIF format for upload to the POTA website. The two most popular logging apps are HAMRS (works offline, great mobile app) and RumLogNG. Many activators use these in the field on a tablet or phone. But if you're nervous about technology failing, paper is the backup that never crashes.
One thing beginners often miss: you need to log the park reference number (e.g., K-1234) in your upload. POTA's website has a "parks" search where you can find the reference for wherever you're going. Look it up before you leave home and write it at the top of your log page.
What to Bring: The Full Packing List
Here's a practical list. Don't overthink it:
HF transceiver (FT-891, G90, or whatever you've got)
20 Ah SLA battery, fully charged, with Powerpole pigtails
EFHW or dipole antenna, pre-measured and coiled
20-33 ft fiberglass mast + stakes + bungies
50 ft coax (RG-8X is a good weight/loss tradeoff for portable)
PL-259 to SO-239 adapter if your antenna has a different connector
Spiral notebook + pencil
Phone or tablet with HAMRS loaded and park reference entered
Extra coax barrel connector — the one time you don't bring it, you'll need it
Coffee. Non-optional.
On the Drive Over
Check the POTA website and confirm your park is on the list and is currently valid. Some parks get delisted or require special access. Also check the POTA spotter network (pota.app) to see if anyone else is already activating the same park — if so, you might want to call it a combo activation, or head to a different park.
Getting Your 10 Contacts
Once you're set up and on the air, self-spot yourself on pota.app. The spot includes your callsign, frequency, mode, and park reference. Within a minute or two you'll start getting callers. A basic CQ call looks like: "CQ POTA CQ POTA, this is November One Juliet Uniform Romeo, portable, activating K-1234, listening."
Keep exchanges short — callsign, signal report, park number. People in the pileup have places to be. After 10 contacts, you've got a valid activation. After 44, you qualify for a "certificate." But don't fixate on a high count on day one — just get the 10, breathe, enjoy it, and decide if you want to keep going.
Most activators find that 40m SSB during the afternoon is the most reliable band for stacking contacts quickly. 20m opens up things geographically but can be quieter on weekdays. If you're running 100W and have a decent antenna, both bands will work.
Watch & Learn
Want to see what an activation actually looks like before you go? These videos will fill in the gaps:
[POTA Tips, Tricks & Hacks for your activation (N1JUR talk)](https://www.youtube.com/watch?v=4eRNNE5tLfw) — a deep dive into the small operational details that make activations smoother
[How POTA is Changing Ham Radio Forever](https://www.youtube.com/watch?v=zXcVsEP977c) — a big-picture look at why the program has grown so fast and what it means for the hobby
[How to Activate POTA Parks the RIGHT Way (N4BFR + AC4SH)](https://www.youtube.com/watch?v=gnFHbwgt6YM) — two experienced activators walk through their setup and operating habits
Go Do It
You're more ready than you think. The gear requirements are low, the learning curve is quick, and the community is absurdly welcoming. Your first activation will probably not go perfectly — something will be loose, the band will be slow for a few minutes, you'll forget to log somebody. That's fine. It's part of the deal, and it makes the 10-contact milestone feel earned.
If you've got questions, come hang out in the Brew & Activate Discord at [discord.gg/zwg9mWyHmY](https://discord.gg/zwg9mWyHmY) — there's always somebody in there who's done their 200th activation and is happy to talk gear, parks, and strategy. Or swing by [n1jur.com](https://n1jur.com) for more guides. Now go find a park.

Comparing the Wolf River SB1000, MadDog 80 Coil, and Rez 80 Antennas: Which One is Right for You?
When it comes to enhancing your radio communication experience, choosing the right antenna can make all the difference. Among the popular options available, the Wolf River SB1000, MadDog 80 Coil, and Rez 80 antennas stand out for their unique features and performance. Here, we’ll explore the differences between these three antennas to help you make an informed decision.
When it comes to enhancing your radio communication experience, choosing the right antenna can make all the difference. Among the popular options available, the Wolf River SB1000, MadDog 80 Coil, and Rez 80 antennas stand out for their unique features and performance. Here, we’ll explore the differences between these three antennas to help you make an informed decision.
Wolf River SB1000 Antenna
Features:
Type: Vertical HF Antenna
Frequency Range: Covers multiple HF bands (typically 10-80 meters)
Design: Portable and lightweight, making it suitable for field operations
Construction: Made from durable materials, often featuring stainless steel components
Pros:
Versatile: The SB1000 is designed to operate on multiple bands, giving you flexibility in your communications.
Easy Setup: Its portable design makes it easy to set up and take down, ideal for field use or portable operations.
Durability: Built to withstand various weather conditions, providing reliable performance over time.
Cons:
Size: While portable, it can be larger compared to other options, which might not suit all users.
Ground Plane Requirement: May require a proper ground plane for optimal performance.
MadDog 80 Coil
Features:
Type: Loaded Vertical Antenna
Frequency Range: Primarily designed for the 80-meter band but can operate on other bands with proper tuning
Design: Compact and easy to transport, often featuring a coil-based design for efficiency
Pros:
Compact Size: Its small form factor makes it easier to transport, especially for portable operations.
Efficiency: The coil design allows for effective tuning within the 80-meter band, providing good performance.
User-Friendly: Often comes with straightforward setup instructions, making it accessible for beginners.
Cons:
Limited Bandwidth: While effective on 80 meters, its performance on other bands may not be as strong compared to other antennas.
Lower Power Handling: May not handle high power levels as well as some larger antennas.
Rez 80 Antenna
Features:
Type: Horizontal or Vertical Antenna
Frequency Range: Designed primarily for the 80-meter band
Design: Known for its efficiency and low noise performance
Pros:
Low Noise Reception: The design often leads to less noise pickup, making it ideal for weak signal reception.
Versatile Installation: Can be set up as either a horizontal or vertical antenna depending on your needs and space.
Performance: Offers excellent gain and performance on the 80-meter band.
Cons:
Installation Complexity: May require more effort to install properly, especially if configuring for horizontal use.
Limited Multi-Band Capability: Primarily focused on the 80-meter band, which may not be ideal if you require multi-band functionality.
Which One Should You Choose?
Consider Your Needs:
If you need versatility: Go for the **Wolf River SB1000**. It’s excellent for multi-band operations and field use.
If you want a compact solution: The **MadDog 80 Coil** is great for portability and effective performance on the 80-meter band.
If low noise reception is a priority: Choose the **Rez 80 Antenna** for its efficient design and excellent performance on 80 meters.
Each antenna has its strengths and weaknesses, so your choice should align with your specific needs and operating conditions. Whether you’re a casual operator or a serious amateur radio enthusiast, understanding the differences between the Wolf River SB1000, MadDog 80 Coil, and Rez 80 antennas will help you make the best choice for your radio setup. Happy transmitting!

Embracing the Challenge: Why Run QRP During a POTA Activation?
For amateur radio enthusiasts, the thrill of communication is often magnified by pushing the boundaries of what's possible. One of the most fulfilling ways to do this is by running QRP (low power, typically 5 watts or less) during a Parks on the Air (POTA) activation. Here’s why you might want to consider this exciting combination for your next amateur radio adventure.
For amateur radio enthusiasts, the thrill of communication is often magnified by pushing the boundaries of what's possible. One of the most fulfilling ways to do this is by running QRP (low power, typically 5 watts or less) during a Parks on the Air (POTA) activation. Here’s why you might want to consider this exciting combination for your next amateur radio adventure.
Challenge and Skill Development
Running QRP is not just about reducing power; it’s about enhancing your skills. With limited power, you must optimize your antenna setup, choose efficient frequencies, and perfect your operating techniques. This challenge can significantly improve your understanding of radio propagation, antenna theory, and station setup.
Portability and Convenience
QRP rigs are often compact and lightweight, making them ideal for portable operations in parks. This portability allows you to easily carry your equipment to remote locations without the burden of heavy gear. Whether you’re hiking to a scenic overlook or setting up in a dense forest, QRP gear ensures you stay mobile and flexible.
Environmental Considerations
Using low power aligns with eco-friendly practices. Lower power consumption means less battery usage and a smaller environmental footprint. This can be particularly important in protected park areas where minimizing impact is key.
Community and Camaraderie
The QRP community is known for its camaraderie and support. By participating in QRP during a POTA activation, you join a group of like-minded operators who value skill and ingenuity over brute force. Sharing tips and experiences with fellow enthusiasts can enrich your amateur radio journey.
Cost-Effectiveness
QRP equipment is generally more affordable than high-power rigs. This makes it accessible for beginners or those looking to expand their setup without significant investment. Additionally, low power reduces the need for expensive power supplies and large antennas.
Propagation and Conditions Mastery
Engaging in QRP forces you to pay closer attention to propagation conditions. You’ll learn to take advantage of openings and understand the nuances of different bands, which can be incredibly rewarding when successful contacts are made.
Enhanced Satisfaction
There’s a unique satisfaction in making successful contacts over long distances with minimal power. Each QSO feels like a mini victory, a testament to your skill and the efficiency of your setup. For many, this sense of accomplishment is the ultimate reward.
Running QRP during a POTA activation is more than just a test of technical skill; it’s a journey into the heart of amateur radio’s spirit. By embracing the challenge, you not only enhance your capabilities but also deepen your appreciation for the art of communication. So pack your QRP rig, head to your nearest park, and experience the magic of low-power operation firsthand!

The Advantages of Operating Amateur Radio on the Beach or Coastline
For amateur radio enthusiasts, finding the perfect operating location can significantly enhance communication capabilities. One of the most rewarding places to set up your gear is at the beach or along the coastline. The unique environment offers several advantages that can improve your radio experience. In this blog post, we’ll explore the benefits of operating ham radio by the ocean and discuss how salt water plays a crucial role in enhancing radio transmissions.
For amateur radio enthusiasts, finding the perfect operating location can significantly enhance communication capabilities. One of the most rewarding places to set up your gear is at the beach or along the coastline. The unique environment offers several advantages that can improve your radio experience. In this blog post, we’ll explore the benefits of operating ham radio by the ocean and discuss how salt water plays a crucial role in enhancing radio transmissions.
Why Choose the Beach or Coastline?
Open Space and Minimal Interference: Beaches and coastal areas typically provide vast, open spaces free from urban clutter and electronic interference. This makes it easier to establish clear signals, as there are fewer obstacles that can obstruct radio waves.
Enhanced Propagation: The proximity to salt water can greatly enhance radio wave propagation. Coastal environments allow for better signal transmission and reception, which is crucial for reaching distant stations. The combination of the horizon and the ocean can create favorable conditions for both HF and VHF/UHF communication.
Relaxed Environment: Operating from the beach offers a serene and relaxing atmosphere that can enhance your overall operating experience. The sound of waves and the fresh ocean breeze can make for a refreshing break from the usual operating conditions.
Community Engagement: Beaches are often social hubs where fellow radio enthusiasts gather. This provides opportunities for meetups, contests, and spontaneous QSO (conversation) sessions, fostering a sense of community and camaraderie.
The Benefits of Salt Water for Transmission
One of the most significant advantages of operating amateur radio near the ocean is the presence of salt water. Here’s how it enhances your transmission capabilities:
Increased Ground Conductivity
Salt water serves as an excellent ground plane for radio waves. Its high conductivity helps improve signal strength and reduces loss during transmission. This is particularly beneficial for HF (High Frequency) bands, where ground conditions can greatly impact performance. The conductivity of salt water creates a better reflection of radio waves, allowing signals to travel further.
Enhanced Antenna Performance
When using antennas near salt water, operators often experience improved performance. The ocean acts as a natural reflector, allowing antennas to radiate signals more effectively. This is particularly true for dipole antennas or vertical antennas positioned close to the water, which can take advantage of the sea’s conductive properties.
Lower Noise Levels
Coastal areas often have lower ambient noise levels compared to urban environments. The combination of distant signals reflecting off the water and minimal interference allows for clearer reception. This is especially important for weak signal work, where every decibel counts.
Greater Range and Coverage
Salt water provides better propagation characteristics, which can significantly extend the range of your radio communications. Operators often report successful long-distance contacts (DXing) from coastal locations, making it an ideal spot for those seeking to connect with stations around the globe.
Practical Tips for Operating at the Beach
To make the most of your amateur radio experience at the beach, consider the following tips:
Choose the Right Time: Early mornings or late afternoons are often the best times for radio propagation, as conditions can be more favorable during these periods.
Use Portable Gear: Since beaches can be sandy and windy, opt for lightweight, portable gear that’s easy to set up and pack away.
Secure Your Equipment: Ensure your radio and antennas are securely anchored to prevent damage from wind or waves.
Stay Hydrated and Protected: Remember to bring water and sun protection, as operating for extended periods in the sun can be draining.
Operating amateur radio at the beach or coastline offers a unique and rewarding experience for enthusiasts. The combination of open space, minimal interference, and the benefits of salt water can significantly enhance your communication capabilities. Whether you’re seeking to make long-distance contacts, enjoy a relaxed operating environment, or connect with fellow hams, the beach is an ideal location for your next radio adventure.
So pack your gear, head to the coast, and enjoy the waves—both in the ocean and on the air!